The Different Types of Concrete Pumps

Construction projects require a constant supply of concrete, and without it, the construction project will be impossible to complete. Construction projects are usually faced with the issue of how to efficiently handle a large quantity of concrete manually. To resolve this issue, the use of the different types of concrete pumps at construction sites was invented.

This invention made the handling and placing of large concrete easier. Concrete pumps also made the construction process of tall buildings, skyscrapers and large construction projects more organised and efficient. The market has different types of concrete pumps available according to the size of the construction projects. There are also many concrete services which allow concrete pumps to be hired.

The different types of concrete pumps used for the diverse construction project are cost-effective. During construction projects, it is very crucial to choose the right concrete pumps that are economical, efficient and one that is specifically designed for your particular construction project. Below are the different types of concrete pumps and their benefits.

Concrete Pumps can be categorised into boom pumps, concrete pumps trucks, stationary pumps and concrete line pumps.

a concrete pump pouring concrete onto construction site

Boom Pump

A boom pump is a type of concrete pump which is characterised by a controlled hydraulic arm where concrete is placed and dispersed accurately in the right direction where it’s needed. 

They’re usually attached to a truck. Boom pumps are normally used for huge construction projects. It can easily navigate any barrier on its way and provides the right portions and angles during the construction process.

It’s easy to manoeuvre a boom pump. And it can churn out a large amount of concrete at a fast speed. It’s highly recommended to use the boom pumps for large construction projects.

Stationary pump

The stationary pump, unlike boom pumps, is characterised by less manoeuvrability. It’s usually attached to a truck or mounted on a trailer and the concrete is pumped through rubber hoses or steel pipelines. Working with a stationary pump requires that the direction of the pipeline be directed to the particular portion where the concrete is needed.

Stationary pumps are known for pouring concrete at a slower speed than other types of pump. So it’s recommended where the demand for a smaller volume of concrete is required for a construction project.

Specialised Usage Pump

Specialised usage pumps are one of the different types of concrete pumps that are readily available. Specialised Usage Pumps are a premium option. They can be designed for special type of construction projects, such as construction projects in mines or tunnels.

Concrete Line Pumps

Concrete line pumps are usually referred to as a trailer-mounted concrete pump or truck-mounted concrete pump because of its arrangement. The arrangement features a line pump attached to the trailer or the back of the truck. They are compact and recommended for small construction projects.

When choosing the right type of concrete pumps for a particular construction project, factors like the design of concrete mix, vertical and horizontal distances, size of the aggregate being used, volume or quantity of concrete should be carefully considered. Thank you for reading this month’s blog. Should you have any queries or perhaps are looking for equipment to hire, call us on 01442 389105 or visit our contact page for more details.

The post The Different Types of Concrete Pumps first appeared on Base Concrete.

How to Mix Concrete by Hand or in a Mixer

Lots of people fear using concrete. If it goes wrong, it can be difficult to fix, but for smaller domestic jobs it’s actually a lot easier than many people think. With this guide, we’ll go over the different ways to mix concrete so you can decide what’s best for you when attempting your DIY project.

Concrete Proportions

Concrete has 3 main ingredients. Cement, aggregate, and sand. These ingredients are mixed with water, which when dried out, binds into a solid, very hard material. Depending on what you’re using the concrete for, these can be mixed in different proportions to give you different finishes and strengths.

It’s very important to get these proportions correct. With too much sand, your concrete won’t be hard enough to withstand the test of time. However, too much aggregate and you’ll be rushing to find a way to cover it up and pretend that it isn’t there.

Mixing Methods

In a domestic setting, there are several different approaches you can take to mix your concrete. If you’re happy giving the different proportions a go, you can either do this by hand or by using a mixer. For small scale jobs, mixing by hand can be ideal as it’s easy to keep track of the consistency and see how it’s going. This can often be a good thing to do as a practice if this is your first time. For larger jobs, a concrete mixer can save you hours of time and strength mixing larger amounts of concrete together.

When it comes to domestic concrete, it’s often overlooked that there are some other options also available to you, especially for slightly larger jobs such as concrete bases for sheds, summerhouses and other garden accessories. The main differences between domestic and commercial worksites are space. Often with a commercial worksite, the work will be planned to make these processes as efficient as possible, allowing the concrete mixers to reverse right up to where they’re going. However, this doesn’t mean you can’t utilise similar methods.

Types of Concrete Mixers

There are two main different types of concrete mixer. There are ordinary concrete mixers and also volumetric concrete mixers and both of these have different uses. You’ll likely have seen ordinary concrete mixers or mini mixers driving around quite frequently. These have the advantage of being able to transport one of many different mixes of concrete. Extra ingredients can be added to the concrete at the factory in order to provide different properties such as waterproofing or extra fibres for additional strength. However, this isn’t often needed when it comes to domestic concrete.

The other type of concrete mixer is a volumetric concrete mixer. These are ideal for domestic concrete as you don’t need to worry about having too little or too much. ‘Mix as you go’ concrete mixers contain the raw ingredients needed and as you pour out the concrete will mix it straight away. They also have the added advantage over traditional concrete mixers of being able to supply multiple different mixes of concrete to the same job without having to pay the additional cost of bringing in a second load.

Concrete mixers and volumetric concrete mixers are also a great choice for people taking on DIY projects that don’t want to take the risk of getting the mix wrong. All you’ve got to worry about is where it goes with the extra guarantee of knowing that it will stand the test of time. Thank you for reading this blog post. Should you have any enquiries, feel free to call us on 07812 182778 or visit our contact page for more information.

The post How to Mix Concrete by Hand or in a Mixer first appeared on Base Concrete.

Benefits of Onsite Mixed Concrete

While you’re in the planning stages of your latest project, have you considered the benefits of onsite mixed concrete? If not, let us explain!

Budget

One of the great benefits is the amount of control that you have if you opt to use on-site mixed concrete. You see with this method you will receive the exact amount and mix of concrete that you require. As a result, you are controlling your budget by only paying for the amount you use. It avoids having loads of unused concrete hanging about!

Consistency of Concrete

Using mixed on-site concrete supply allows you more control over the consistency of the concrete. This is because, with the volumetric mixers that will be used, the materials that go into the concrete are kept separate until the batching process. This will mean you would be able to pick an exact consistency that would suit your needs.


Say, for some reason the consistency required changed halfway through the project, have no fear, as it’s on-site, this can still be altered! The great thing is the logistical advantage-you have when the concrete is delivered directly to your site. You will find that many companies offer next or even same-day delivery.

Fresh Concrete

That points us to another mixed concrete benefit. If you have the supply on-site, you’re providing your team with access to constant fresh concrete. When it comes to the pouring, it is always fresh. There are times when a delay may hit your project but that cannot be helped, and the fact you can keep the concrete fresh is a massive bonus.


Do note that if traditional drum mixers are being used, these can be impacted by delays because of their need to transport pre-mixed concrete in a drum from the yard to a site, meaning there is a chance it could go off. But with a mixed onsite service, there will be the option to change or extend the order on the spot, because the concrete providers will be able to produce the exact type of concrete needed-fresh!

Reduced Waste 

Keeping with the notion of how much more control you have with this concrete set up when it comes to on-site mixed concrete it is easier to scale your needs in relation to project size. Working on a very large site? You would benefit from volumetric mixers as these can hold up to twice the amount of the traditional drum mixers. Or perhaps it’s more of a smaller project? Likewise, on a small site, the mixers can produce smaller volumes with ease. This helps you to have the amounts you need and cut down on waste in the process.

Concrete Waste

Regarding quality, all the best onsite mixed concrete services will make sure to be providing you with concrete that is made from only the finest materials. Also, keep in mind you will be able to have the mix tailored to suit your needs, so if you require a tougher mix that can be made up or something more workable can also easily be fixed up, no issues.


If you agree that onsite mixed concrete is the way to go for your project, Base Concrete can help. Thank you for reading this blog post. If you are looking for anything to do with concrete, Base Concrete has you covered. Call today on 01442 389105 or visit our contact page for more details.

The post Benefits of Onsite Mixed Concrete first appeared on Base Concrete.

Top Tips To Sealing A Concrete Floor

How To Seal A Concrete Floor?

Using concrete flooring in your home can be an excellent choice. Especially if you’re interested in the durability of your floor. However, to make a concrete floor last it’s important to seal it properly since concrete is porous.

Sealing a concrete floor is an effective way to keep your floor free of stains from substances such as grease, oil, water, and others. As if that’s not enough, sealed floors look beautiful and are easier to clean.

To ensure that the sealer is effective, however, the application process has to be done properly. Everything you do, from surface preparation to picking the right application tool, will go a long way towards determining the final outcome. 

How To Go About Sealing A Concrete Floor 

Here’s a quick summary of what you should do when sealing a concrete floor

Clean the floor (remove stains, dust, oil, etc. from the concrete)  Remove any old sealer from the floor Use an etching solution to open up the concrete Use a sprayer or roller to apply the first thin coat of sealer  After the first layer has dried, apply a second coat of sealer in the opposite direction Leave the sealer on the concrete until it dries fully (avoid driving or walking on the concrete until it’s dry) 

Cleaning the floor

To avoid inconvenience, you should remove the furniture and everything else from the room. Keep in mind that you will need somewhere to store the items for no less than one week. Once the room is clear, sweep it thoroughly, and then proceed to clean any area that is still dirty. 

You can use mineral spirits to clean grease spills. Once the floor looks clean, use a concrete cleaner to ready the floor for sealing. Rinse the cleaner off, and then wait for the floor to dry. At this point, you can use a concrete repair caulk to fill any visible cracks. Then finally, wait until the caulking has dried completely.

Removing the old sealer

If the floor had an old sealant, you have to wait before applying the new sealant. If you’re not sure whether a sealant was used on your floor or not, you can use water to test this. To do this pour approximately one cup of water on the concrete.

If the water does not soak into the floor but instead beads up and remains on the surface, the floor had been sealed. If the floor had not been sealed, the water would soak into the floor. To remove the sealant, you can use a chemical stripper.

Since chemical strippers are acid-based, be sure to protect yourself when removing the sealant. After removing the sealant, you’ll have to let the floor dry for at least 24 hours before proceeding.

Choosing the sealer

There are four main types of sealers to choose from:

•   Acrylic sealers 

This kind of sealer sits on top of the floor and is mainly used to seal interior floors. Acrylic sealers are easy to apply, but they don’t protect the floor effectively against grease and oil stains when compared to other sealers.

•   Epoxy sealers 

Despite being more durable compared to acrylic sealers, this type of sealer also sits on top of the concrete. Epoxy sealers protect your floor effectively against grease stains, but they are difficult to apply. They are also available in various colors enabling you to change the look of your floor.

•   Polyurethane sealers 

This type is mainly meant for use over other types of sealers. Polyurethane sealers have UV protection, which keeps them from turning yellow over time. They also sit on top of the concrete, but the layer is usually thinner.

For this reason, polyurethane sealers are mainly applied over epoxy as the top layer. The sealers are available in semi-gloss, matte, and glossy finishes. Such sealers are typically fine when used over other sealers, but if you’re not sure, you can always get some clarification from the shop you are buying from.

•   Silane/siloxane sealers 

You can use this type of sealer if you don’t want to change the look of your floor. Since the sealers penetrate the concrete, it won’t become glossy or darker. It will retain the matte grey color. This kind of sealer lasts 20 years or more and is effective in protecting the floor against stains and deterioration.

concrete flooring

pplying the sealant

Here’s what you should do when applying the sealant:

1. Carefully read and understand the instructions

Every sealant is a tad different from the other. For that reason, you should read the manufacturer’s instructions to attain quality results for your project. Be sure to pay attention to important details such as the most appropriate temperature and humidity recommendations for application.

2. Ventilate the room

In whatever room you’re working from, ensure that there is enough ventilation by opening the windows and doors where applicable. You can also use an outside-facing fan to facilitate the movement of air from the room to the outside area.

3. If using an epoxy sealant, mix the two parts together

Epoxy sealants come in two different containers whose content should be mixed before application. In such a case, you should pour the content of the smaller container into the bigger one and then use a stir stick to mix them thoroughly.

You should mix them only if you’re ready to start the application process. It’s also important to note that you’ll have a period of one hour or so to get the epoxy down. For that reason, you have to be quick when working.

4. Divide the room into smaller sections 

It’s recommended that you divide the room into four sections for ease of application. You should start with the least accessible section, and work your way out to the door so that you won’t have to walk on the wet sealant.

5. Use a small paintbrush when sealing the edges of the floor

Get a paintbrush that is 5.1 to 7.6 cm wides and use it to apply the sealer along the edges of the concrete floor where the paint pad or rolling brush may not reach. Be sure to use nice, even strokes when applying the sealer.

6. Apply the sealer using a rolling brush or paint pad 

Pour some sealant into a painting tray and then dip a roller brush or a paint pad into the paint. If using a roller brush, be sure to roll the brush evenly in the paint. Use the roller brush or paint pad to apply a thin coat of the sealer along the edge that you’ve already painted.

Continue applying the sealer across the floor until you’ve covered the entire floor. When applying the sealer, you should ensure that there is always a wet edge to carry on from. The reason for doing so is to achieve a uniform look on the floor. 

Since you’ve already divided the room into smaller sections, you can work on each one of them at its own time. As you apply the sealer, make sure that you spread it evenly across the floor. You should also keep track of your area of coverage to avoid ending up with some patches that haven’t been sealed.

7. Apply a second coat 

For a smooth and even finish, you should apply a second thin coat. To ensure better coverage of the sealant across the floor, you should apply the second coat at right angles to the first one. Let the sealer dry as per the time recommended by the manufacturer on the sealant can, before walking or driving on the concrete. You should be ready to wait for up to four days to allow the sealant to dry completely.

Final thought, 

Sealing your concrete floors is a foolproof way to increase their lifespan while also enhancing their beauty. The good thing is that you can easily complete a floor sealing project by yourself. If, however, you’re not particularly confident with your DIY skills, you should hire an expert.

If any of our high-quality services interest you, give us a call on 01442 389105 or 07812 182778 today. Or fill out the enquiry form on our contact page for more information.

The post Top Tips To Sealing A Concrete Floor first appeared on Base Concrete.

How To Lay A Concrete Base

Follow these steps for the best DIY project

If you are going to be laying a concrete floor for a DIY project it is important that careful preparation is made and each recommended step is followed. You may want to consider hiring a professional to do the work for you. Or at least certain parts. Perhaps the messier steps! Let’s take a look at how to lay a concrete base with this handy guide:

Mark Out Required Area

The first step is to mark out the required area for your concrete base, this can be done using pegs and string. And will need to be 100% accurate. So, make sure all sides are straight.

Dig Out The Area

Next, it is time to dig out the area you have just measured. Dig the ground in the marked area to around 175mm deep for a smaller shed or 225mm for a larger one. As you are going to need a level base it is a good idea to keep the depth you are digging as consistent as you can. Afterwards, remove the pegs.

dd Crushed Stone To Dust

For this step, you will need an MOT type 1 stone, this is crushed stone from 40mm to dust or gravel. Shovel into the space a minimum thickness layer of 75mm to form a hard base for the concrete layer. The depth should be about 100mm for a shed and around 150mm for something larger like a summerhouse. 

Measure, Cut And Fit 100m Timber Rails

Now it’s time to measure and cut and fit 100mm timber rails to the base and make sure the framework is level. This step is to create a framework that offers a strong and stable edge to the concrete and to ensure it is level.

Spread Out Layer 

Spread out that layer of MOT stone or gravel. Then use either a manual earth rammer or powered wacker plate to compact it. This will help create a firm base for the concrete and stop it from cracking over time.

Mix The Concrete 

So, now it is time to mix the concrete. Spread it out evenly and level it off. After smoothing over, grab a stiff broom to lightly brush across the base helping to encourage a textured non-slip surface. 

Keep an eye on the weather forecast at all times. At this stage, if wet weather is forecast cover the base with polythene or a tarpaulin for 24 hours. If it’s hot weather instead then use sacking and keep it damp for a day otherwise the concrete could too dry quickly. This will result in shrinkage and even cracking. You then need to leave it for at least three days to cure.

Finishing Touches 

For finishing touches, look to see if your base is flush with the ground. If this is the case, you will have a space running around the edge of the concrete where the rails were. You can fill this with pea gravel, it will help drain away moisture from the concrete base. Now you just need to place on your base whatever your intended item was!

We hope that our blog has helped you understand how to lay a concrete base. If you have any questions please don’t hesitate to give us a call on 01442 389105 or alternatively head over to our contact page to fill in our online enquiry form. 

The post How To Lay A Concrete Base first appeared on Base Concrete.

Volumetric or Ready Mix

What’s The Difference? 

Concrete is, without a doubt, one of the most common construction materials. This is because it can be used for a wide variety of projects. It is essentially a blend of water, Portland cement, and aggregates. The two basic types of concrete used in the construction industry are site-mixed concrete and ready-mix concrete. 

There are slight differences between these two types of concrete. It is important to be aware of the differences, even if they seem subtle to you, as doing so can make it easier to choose the right concrete for your project. Here are the major differences between site-mixed and ready-mix concrete:

Preparation 

One of the obvious differences between these two types of concrete is the way they are mixed. Ready-mix concrete is usually manufactured at a plant and delivered to the clients in a ready-to-use state. It’s typically sold by volume, which is measured in cubic meters. 

Site-mixed concrete, on the other hand, is prepared at the client’s construction location. The components are mixed in specific ratios to achieve different degrees of strength. When making this type of concrete, caution must be taken to avoid quality issues. 

Time

If you are working on a time-conscious project, it’s obvious that speed is important. In such a case, you should choose ready-mix concrete, as it’s easier to load and off-load, which may save you time.

Volumetric concrete is more time consuming to work with, as you have to pause part of the project while the mix is being created. 

Equipment

An important factor for any construction project is your equipment and where you can source what you need. Volumetric concrete requires the use of equipment such as batch mixers. Whereas, ready-mix concrete does not require the project owner to hire equipment, as the concrete is not made on-site.

Convenience

Ready-mix concrete is convenient for almost any kind of construction project, as it can be delivered to multiple sites within the project location. However, volumetric concrete has to be mixed as close as possible to the point of use to avoid contamination. 

Another major difference between ready-mix concrete and volumetric concrete is storage requirements. You will require controlled storage space for the materials used to make volumetric concrete. However, when using ready-mix concrete you won’t need any extra storage space. 

Quality

Ready-mix concrete has a better and more consistent quality when compared to site-mixed concrete. This is because ready-mix concrete is mixed in an automated and controlled environment. 

Material takeoff

The materials used to make site-mixed concrete have to be estimated individually and purchased separately. However, ready-mix concrete is simply calculated as a single item. 

Waste 

Working with site-mixed concrete causes material loss not only when the materials are being mixed but also during storage. Whereas, ready-mix concrete causes minimal waste on your site because the concrete is delivered in a ready-to-use state. 

Workforce

When working with ready-mix concrete, the only time you may require skilled labour is when pouring and compacting the concrete. However, you will require more man-hours when working with volumetric concrete.

In summary,  

Both types of concrete have some major differences. It is important to research which type of concrete is best for your construction project. Generally, ready-mix concrete is a better option as it can be used for a wider variety of projects.

if you have any questions make sure to contact us.

The post Volumetric or Ready Mix first appeared on Base Concrete.

Did you miss our previous article…
https://concretedoctorsolutions.net/?p=210

Phytodepuration with Degre.47

Depurating Landscape: an introduction to plants as a water treatment alternative

This article is a collaboration between Degré47 and Critical Concrete, aiming to be an introduction to phyto purification’s general concepts for self-constructors. It also aims to shed light on these systems as low-cost, low-tech and self-constructible wastewater treatment solutions.

Degre.47 Logo

The wastewater issue

It isn’t new to argue that the disorganized and centralized population growth in urban areas has brought challenges to the natural environment. In addition to CO₂ emissions, waste production and impermeabilization of soil, wastewater is one of the fundamental issues local governments need to address. At the very least, the wastewater from human activities of any sort needs to be treated to be assimilated by nature.

There are many water treatment solutions, from the collective to the individual scale. One of the most common sanitation solutions in urban centres is a collective one: wastewater treatment plants. These centres manage the wastewater through physical, chemical and biological processes in a complex and highly specialized infrastructure. [1]

After the physical filtration through decantation, flotation, filters and/or membranes, traditional treatments commonly make use of chemical products, notably coagulants (ferric chloride, aluminium sulphate, etc.), flocculants, and sometimes disinfectants such as chlorine or ozone. These processes, however, are arguably costly and energy-intensive, not to mention polluting. They also necessarily generate by-products such as coarse waste, sand and sludge that must be cleaned, decanted, stabilised and treated. [2]

In addition, in the ever-growing urban centres, many areas aren’t able to access the public sewage system, bringing up the importance to think of alternatives for wastewater treatment, especially low-cost and low-maintenance ones, as the mismanagement of effluents can pose a serious issue to natural hydric resources. [3]

Individual or small-scale collective sanitation solutions might be a good way to tackle the situation. A solution that stands out is the phyto-purification system with its low energy and low maintenance (as there’s no need for emptying and transporting). It is already the main sanitation system in France for cities of less than 1,000 inhabitants. [4]

This system, which is based on the use of plants (phyto) to filter the wastewater has been proving to be a low-cost yet highly efficient way to treat domestic wastewater. Because it is energetically and logistically autonomous, phyto-purification can be considered an ecological sanitation solution.

Purification with plants

Phyto-purification consists of wastewater purification systems that make use of aquatic plants, reproducing water depuration processes typical of humid areas. There are two main methods of phyto purification: lagooning, which consists of ponds with microphytes, similar to natural wetlands, and the filters planted that make use of macrophytes and consist of ponds filled with aggregates in which the water circulates for treatment. [5]

In these systems, the plants are responsible for bringing oxygen through their roots whereas the aggregates act not only as a physical filter — as bigger particles can’t penetrate it — but also as a chemical filter as they absorb phosphorus and ammoniacal nitrogen. In these basins, an important biological process also occurs: the microfauna present in the system degrades organic matter, turning it into nutrients to be absorbed by the plants. [6]

The interesting aspect is that, although the name might indicate, the wastewater is not filtered by the plants. In reality, the plants are the key element to create the environment for bacterial activity, especially in the region around the plants’ roots. The plants greatly benefit from the system as it absorbs nutrients that are liberated in the process of depuration. It’s a symbiotic relationship.

The different methods

There are two groups of phyto purification systems that can be used according to different needs and types of wastewater: lagooning and filters planted. [7]

Lagooning

This system makes use of microphytes (small aquatic plants), microorganisms and (sometimes) substrate to control water pollution. Its main characteristic is the resemblance with natural wetland areas in which the majority of elements are saturated, i.e submerged in water. [8]

In this model, the main purification process occurs on the aquatic surface where the plants and the bacteria present in their roots are located.  In this solution, the effluent is continuously supplied and homogeneously distributed on the surface, flowing horizontally and superficially at low scooping velocity. The water is then collected by a drainage pipe located in the basin’s bottom. [9]

It is important to stress that in this solution, the substrate is not a requirement, and when not applied, fluctuant aquatic species should be used (see image 1). [10]

fig. 1: Different types of plants

Because there’s no emphasis on physical filtration with a substrate, this solution requires a previous treatment focused on the removal of organic matter and suspended solids as it mainly targets the removal of nutrients, especially phosphorus by the plants and bacteria. [11] The use of a substrate, however, can be beneficial if residual suspended solids end up in the basin.

This is a cheap and very low maintenance option, however, it generally requires a larger area than other methods.

fig. 2: surface flow filter with substrate and emergent plants

Filters planted

In this model, the system works through percolation, meaning the wastewater infiltrates the substrate in the process of purification. Here the substrate can be saturated or not. [12]

In this system, the water flows under the surface of the planted bed, through the pores of the substrate. There are two subsurface models: the horizontal flow filter and the vertical flow filter.

In the horizontal model, the flow can be operated in a continuous input, intermittent or even in batch mode whereas the vertical flow model requires intermittent dumping of water in short periods, followed by long resting intervals.

fig. 3: subsurface horizontal flow filter

The long periods between inflow in the vertical flow basin results in a high rate of oxygen transfer from the atmosphere to the system. In aerobic conditions the nitrification can occur, potentiating the nitrogen. In the horizontal flow basin, the poor levels of oxygen favor the occurrence of denitrification by anaerobic bacteria. [13]

fig. 4: subsurface vertical flow filter

In some cases, both flows can be combined to enhance the system’s performance. That’s the case of the double planted filter method applied by Kevin Quentric and documented and published as a tutorial by low-tech lab. [14]

It consists of two different units with a vertical and a horizontal water flow that perform complementary tasks in the process of depurating the wastewater.

fig. 5: section of double filter planted

The first phase of this system is a 60-80 cm² deep vertical filter (VF) which is divided into two parts and each part takes turns receiving the raw sewage (wastewater without previous treatment) from above (see fig. 6). The wastewater spreads on the surface of the first filter and has its solid particles such as hair, fat, faeces, etc, drying and decomposing on the surface whereas the water infiltrates downwards until it reaches the gravel layer. It might sound like the perfect recipe for a smelly garden but, as Kévin explained in emails to us, in a nutshell, bad smells occur in warm, low oxygen environments, when the water stagnates and fermentation takes place. In this double filter planted, however, the vertical filter is in open air, meaning it’s fairly oxygenated. The coarse material retained on the surface of the sand dries out and compost whereas the wastewater quickly infiltrates, without time to ferment. For this, the occurrence of smells is rather rare.

After the percolation, the water then is collected by a drain in the bottom of the VF. This phase of the process is aerobic: the bacteria present in it require oxygen to mineralize the organic particles making the compounds absorbable by the plants.

fig. 6: plan of double filter planted

The second part of the system, the horizontal filter (HF) is 60cm deep, filled with gravel and water 10 cm below the substrate. The second filter is then a poorly oxygenated environment, in which anaerobic bacteria live. These bacteria perform the important task of denitrifying the water by extracting the oxygen from the nitrate molecules, turning them into dinitrogen.

Another interesting aspect is that this system is energetically autonomous. For that, it relies on gravity: each stage into the water purification is lower than the previous one so the water can flow without the use of pumps.

The step-by-step for this method can be found on the low-tech lab site. [15]

Pretreatment

In the double planted filter by Kevin Quentric there’s no need for primary treatment and the raw sewage can be discharged directly on the first filter. In some models, however, pretreatment is required before the wastewater discharge for removal of coarse particles and settleable solids in order to prolong the useful life of the systems, minimising the occurrence of clogging.

The specific type of pretreatment depends on the type of sewage and on the chosen method of phyto purification. Some of the primary treatment methods are:

Screening: This is typically the first step, especially for surface flow filters. Screens are used to remove large debris. [16]Oil removal by decantation: The method is based on injecting fine air bubbles into the grease tank, allowing the grease to rise quickly to the surface (grease is hydrophobic). [17]Sedimentation: Water is typically retained in sedimentation basins for at least 4 hours, allowing particles to settle out. [18]

Domestic phyto-purification

The management of wastewater is of extreme responsibility but depending on which system is chosen and the knowledge of the builders, self-construction is an accessible and plausible option. In addition, professionals in the field can provide help for those seeking to build their own phyto-purification system at home.

When planning a phyto-purification system, some things must be taken into consideration, such as sizing, site and botanical species.

Choosing a site

Ideally, the system should be located as close as possible to the sewage outlet. Remember to make sure the system works with gravity by building it on a slope or working with built and excavated basins. Earthwork is also an option but it might significantly increase the costs of the construction. In the elected site for construction, the soil should be sufficiently compacted to minimise groundwater infiltration and should be above the water table and floodplains.

Another aspect to have in mind is that phyto purification requires space. The site of construction should be of sufficient size to meet current and possible future expansions. Also, insects (especially on surface flow models) and, very rarely, odours can pose discomfort. Therefore, make sure the system is not too close to your and/or the neighbour’s house.

Lastly, the site should be very accessible to construction and maintenance machines and vehicles. [19]

Sizing

The dimensions of the system should be calculated by maximum capacity and a good way to do so is using the value of “inhabitant equivalent”, which relates to the house’s number of rooms and not to the number of inhabitants. In this model, each room of the house = inhabitant equivalent (2 to 4m²). [20]

Plants

To choose what species should be used, a few criteria need to be taken into consideration such as main pollutants to be removed; climatic conditions and local availability of species. They can be emergent, fluctuant or submerged species (see fig. 01). [21]

In Europe, the common reed (Phragmites communis) is one of the main wetland plant species used for water treatment, especially on subsurface flow filters. Some examples are Caltha palustris,Veronica beccabunga and the Typha latifolia.


fig. 7: Phragmites communis, Caltha palustris,Veronica beccabunga and Typha latifolia, respectively.

When the water goes through a pretreatment basin, the plants in the filter basin can be less resistant. Some examples are the Sparganium erectum, Alisma plantago and Iris pseudacorus. [22] Before mixing different species in the same basin, research about possible interactions between the species and if there is competition between them.


fig. 8: Sparganium erectum,Baldellia ranunculoides and Iris pseudacorus, respectively.

It’s advisable to transplant seedlings of plants that have been removed from a nearby location, which are naturally more adapted to the local climate and to do so in the rainy season, in order to minimise conditions of hydric stress for the plants. Plant the botanical species between 20 to 30 days before starting the purification system so there’s time for biological adaptation of the plants to the new environment.

Considering phyto purification

Phyto purification systems are economically efficient solutions. It is estimated that however the initial cost can be elevated (6.500 euros on the hybrid solution by Kevin Quendric, for example), these water treatment systems pay for themselves in about fifteen years time as they do not require electric energy nor maintenance by a qualified workforce.

Unlike conventional purification systems, phyto purification can support insects, birds, amphibians, contributing to the local biodiversity. The lack of chemicals makes the system an environmentally-friendly option available for water treatment.

In addition to environmental and economic upsides, planted filters can be a beautiful landscape project as it has an undeniable aesthetic value. A symbiotic relationship can emerge. The wastewater produced every day by humans is rich in nutrients valuable for certain plants of every shape and colour.

[1] Dias, Richardsson Mendes. (2019) Eficiência da Fitodepuração como Alternativa de Tratamento de Águas Residuárias: Um Estudo de Caso. Teresina:  IFPI

[2]https://www.build-green.fr/phytoepuration-creer-un-filtre-plante/doing_wp_cron=1617567011.8170158863067626953125, accessed 4 April, 2021.

[3] Ibidem

[4] https://wiki.lowtechlab.org/wiki/Phyto%C3%A9puration_eaux_us%C3%A9es, accessed 5 April, 2021.

[5] https://www.lenntech.com/phytodepuration.htm, accessed 5 April, 2021.

[6] http://www.graia.eu/en/our-activities/phytodepuration-and-lagooning/, accessed 5 April, 2021.

[7]https://www.build-green.fr/phytoepuration-creer-un-filtre-plante/?doing_wp_cron=161756 7011.8170158863067626953125, accessed 6 April, 2021.

[8] Ibidem

[9]https://www.researchgate.net/publication/326352770_Manual_de_sistemas_de_Wetlands_construidas_para_o_tratamento_de_esgotos_sanitario_implantacao_operacao_e_manutencao, accessed 6 April, 2021.

[10] Ibidem

[11] Ibidem

[12]https://www.build-green.fr/phytoepuration-creer-un-filtre-plante/?doing_wp_cron=1617567011.8170158863067626953125 , accessed 8 April, 2021.

[13]https://www.researchgate.net/publication/326352770_Manual_de_sistemas_de_Wetlands_construidas_para_o_tratamento_de_esgotos_sanitario_implantacao_operacao_e_manutencao, accessed 8 April, 2021.

[14] https://wiki.lowtechlab.org/wiki/Phyto%C3%A9puration_eaux_us%C3%A9es, accessed 8 April, 2021.

[15] Ibidem

[16]https://www.sciencedirect.com/topics/earth-and-planetary-sciences/water-purification-plant, accessed 9 April, 2021.

[17]https://www.build-green.fr/phytoepuration-creer-un-filtre-plante/?doing_wp_cron=1617567011.8170158863067626953125, accessed 9 April, 2021.

[18] https://www.sciencedirect.com/topics/earth-and-planetary-sciences/water-purification-plant, , accessed 11 April, 2021.

[19https://wiki.lowtechlab.org/wiki/Phyto%C3%A9puration_eaux_us%C3%A9es, accessed 11 April, 2021.

[20] Ibidem

[21] https://www.researchgate.net/publication/326352770_Manual_de_sistemas_de_Wetlands_construidas_para_o_tratamento_de_esgotos_sanitario_implantacao_operacao_e_manutencao, accessed 11 April, 2021.

The post Phytodepuration with Degre.47 first appeared on Critical Concrete.
Did you miss our previous article…
https://concretedoctorsolutions.net/?p=195

Knowing Our Food: Scraps

Picture the last food scrap you threw away. Maybe you were dumping some potato peels in the trash, or composting the outer leaves of a cauliflower. Why did you throw it away? Was it for aesthetic reasons? Did you consider any of that food inedible? Did you have patience in that moment to think of a reason to keep it? Were you out of containers to store it in? There are a multitude of reasons why food ends up in the bin, but we hope this article can make it easier to give your food (waste) another chance.

Food waste, as we’ve explored in this series on food knowledge, is one of the most urgent yet avoidable contributors to climate change. Even a single apple that goes to waste due to poor storage strategies or aesthetic imperfections represents a loss of all its embodied energy. That is to say, all the water and land used to grow it, all the energy used to transport and store it, and all of the caloric energy it could have provided to someone are squandered. At such a small scale, it’s negligible, and yet when everyone believes that throwing away food is not a big deal, it leads to enormous quantities of waste that often end up in landfills, releasing methane (a potent greenhouse gas) into the atmosphere.

Reframing Fruit Scraps

One way to reduce food waste is to rethink what you consider food. Of course, this isn’t to say that you should go around eating nut shells and parts of food that leave you with indigestion, but some foods that we are taught to discard have great flavors and health benefits. 

On the most basic level, this applies to fruits with soft peels. Your apple, pear, peach, or nectarine skins can and should be eaten, but certain dessert recipes ask you to peel them, and in those cases, you can enjoy the peel by itself or use it in tea. Beyond those four, kiwi skin adds fiber and flavor when you eat it with the rest of the fruit, and dried pomegranate and hazelnut skin can be pulverized and added to smoothies or sprinkled on meals as a supplement. But fruit scraps don’t just have to be healthy; we highly recommend making treats out of your lemon and orange rinds. Although candied citrus rinds are great dipped in chocolate or sprinkled on cakes, the ones we made were devoured before they could make it to those stages.

More unusually, banana skins make a wonderful meat substitute in some recipes, like tacos or lasagna. Watermelon rinds make good pickles, but they can also be candied by cooking them in sugar syrup. If you make your own milk alternatives at home, you can use the strained almond, oat, rice, or cashew pulp for baking by replacing some of the flour in a recipe with pulp. (Be aware that milk pulp as a flour replacement will have an effect on the moisture and gluten content, so it only works in small ratios of pulp to flour and doesn’t work for difficult pastries, like croissants.) Another unusual recipe we tried was jam made out of passion fruit rinds. By boiling the rinds, taking the skin off, and mashing them with sugar, we cooked a slightly floral and astringent spread that goes well with bread or scones.

Vegetable Scrap Recipes

It’s helpful to rethink how you treat the scraps from your vegetables, too. Make sure not to waste delicious broccoli stalks or beet greens, and definitely don’t throw out the peels of your root vegetables. When a recipe requires peeled potatoes, the peels make a crispy snack or garnish when baked with some oil. Carrot greens transform into a delicious pesto when blended with oil, garlic, sunflower seeds, and salt.

Anything hard to chew can be blended into sauces, as is the case with kale stems and pea shells, and the stems of chard can be pickled. You can even sauté the tough green ends of leeks! The leaves of cauliflower, broccoli or romanesco broccoli should be cooked and eaten as well. Fava pods can be eaten whole, by grilling or sautéing them. When we tried out this recipe, we topped the pods with lemon juice, salt, chili flakes, and mint. 

It should go without mentioning that any vegetable scraps can be made into broth. Herb stems are superb for this purpose, but celery, onions, leeks, carrots, potatoes, and celery root all provide scraps to flavor your broth. Sometimes, there isn’t enough waste to produce broth, so these scraps can be stored in the freezer while you collect enough.

Similarly to broth, parts of some foods can be added to teas or infused on their own. This is most true for leaves, especially artichoke, persimmon, and strawberry leaves, and for dried or fresh citrus rind. 

Other Food Scrap Uses

Food scraps have purposes beyond just culinary! When making a vinegar-based cleaning solution for your house, lemon, orange and grapefruit rinds add a nice aroma. Banana skins serve as aphid repellents when they are chopped up and buried a couple inches deep around the base of a plant, and have anti-inflammatory properties when used on irritated skin. Coffee grounds and oat, almond and rice milk pulp are great body exfoliants, with rice and oat pulp having additional soothing properties when used on facial skin.

Many food scraps can be used to regrow foods, and these experiments double as educational projects as well. Root vegetables can be regrown by placing the tops of the root in water until new leaves begin to grow, at which point they can be planted in soil. Ginger pieces the size of an inch can be planted directly, and in very little time they will grow more ginger. Long, green vegetables such as celery, lemongrass, leeks, and green onions can be regrown by placing one inch of the bottom part of the plant (not counting the length of the roots) in a tray or glass of water until it begins to grow again. They can then be planted in soil. Leafy vegetables such as lettuce or endives undergo a similar process: the bottom parts are placed in water for several days or a few weeks until there is new growth and they can be moved to soil.

Scrap Dyes

We’ve saved the most exciting use for last: dyes! Many fruit and vegetable skins have tannins that help dyes bond well to natural fibers like cotton, linen, wool, or silk. The most well-known dyes made from food scraps are onion skins and avocado pits and skins. Yellow onion skins make yellow and orange dyes, red onion skins create colors between light lilac and deep magenta, and avocado scraps make a pink dye.

These dyes can be made stronger with alum powder, a mordant which helps dyes adhere to fabric better, but they can be used without it as well because of the presence of tannins in these food scraps. Some natural dyes, like the brown colors from chestnut and walnut shells, are vastly improved with the use of a mordant. Pomegranate rinds make a yellow dye and the leaves from loquat trees make a pink dye, both of which work best using a mordant.

Scraps in the Big Picture

Sometimes the scraps from your food just can’t be eaten or used, and that’s okay! When you get to this point, what’s most important is diverting your food waste from the landfill. If your city has a municipal composting program, you may have curbside compost pickup which is an easy way to reduce the emissions of your food waste, but you can also easily set up a compost in your own backyard, or get a small vermicomposting bin for your kitchen. Food waste can also be used to feed a biodigester, which produces biogas that you can use for energy. Both composts and biodigesters are part of our ongoing research at our production center, so you can expect an article soon about the merits and challenges of these systems in an urban setting. And lastly, if you do not have access to municipal or domestic compost where you live, you can see if any farmer’s markets or local gardens collect compost, and bring your food waste to them on a weekly basis. 

When it comes to food, there are so many systemic and cultural barriers to consuming it mindfully and avoiding waste. Overcoming preconceptions about food scraps that are seen as non-food is one part of working against these entrenched cultural beliefs that promote excessive waste. The problem, like any environmental issue, does not come down to just personal choices, but when these small changes are implemented at a wide scale, they can have significant effects, not just in the amount of food that goes to waste, but towards treating the food we have with respect. When we stop taking food for granted, we respect the seasonality of our produce, and stop letting vegetables go bad due to poor storage. You can read about these two related practices in the previous articles of our Knowing Our Food trilogy, and learn about how to preserve food for long or short periods.

The post Knowing Our Food: Scraps first appeared on Critical Concrete.

Knowing our Food: Preservation

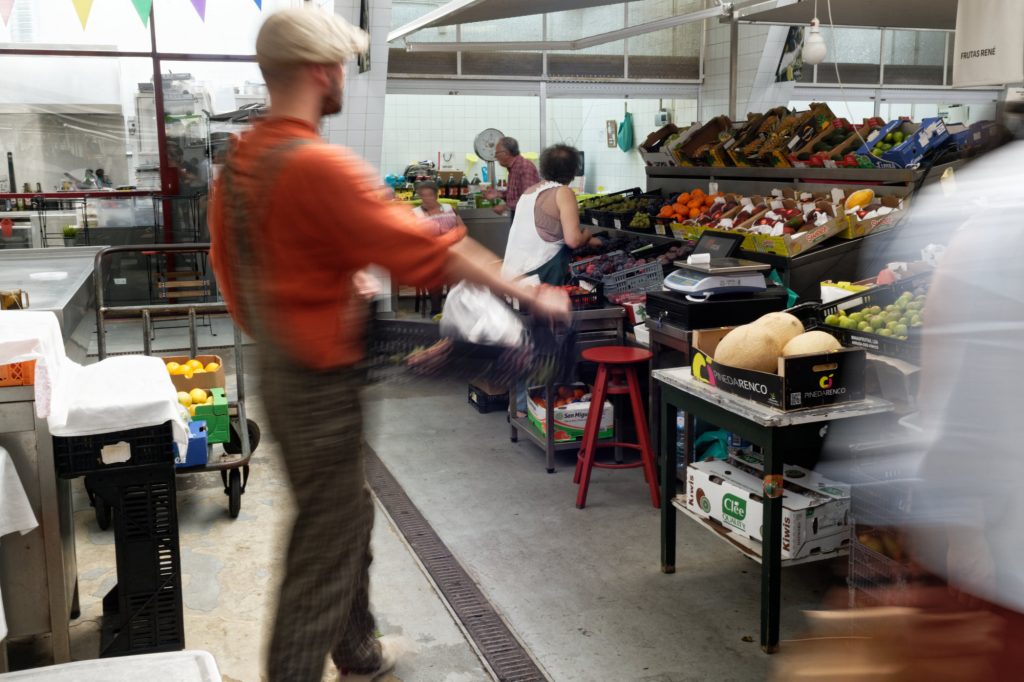
If you are interested in our kimchi making process, click here to skip to the section about kimchi directly.

Do you ever stop to think about how you’re able to enjoy fresh strawberries, blueberries, and peaches in Winter? Contemporary food systems make an enormous variety of food available at any time of year. Produce travels long distances to be sold where it isn’t in season, undermining the business of small farms and emitting greenhouse gases. Local foods are riper at harvest because of shorter travel times, and choosing to buy local also supports the local economy. But even while shopping local, unseasonal food can be harmful to the environment; energy-intensive food production methods like greenhouses can produce 3-10 times the emissions as imported foods.[1]

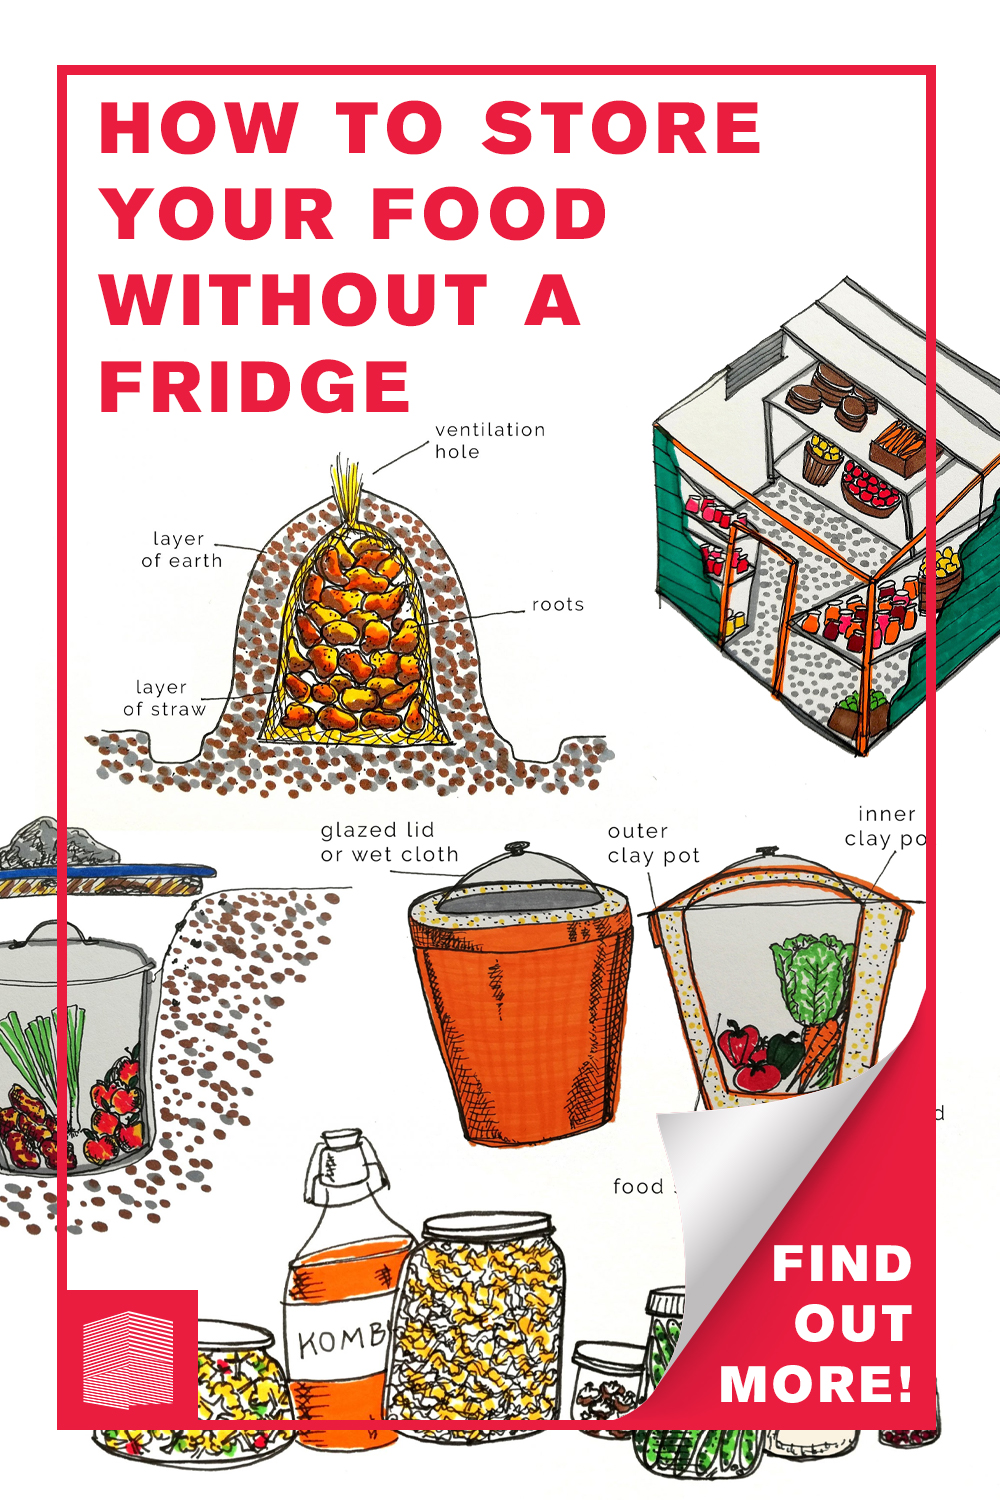
Understanding why our food goes bad and what accelerates its decay helps reduce food waste, but fridges are only good at storing fresh produce for relatively short periods. There is a wide range of alternatives to fridge storage that keep fruits and vegetables from rotting for months or even years. This article will detail some long-term storage methods and their benefits depending on region and culinary purposes, and we will take you through our process of fermenting cabbage for kimchi.

When you decide to cut down the carbon emissions of your food, the produce available to you changes seasonally. The good news is that there are ways to store these foods for long periods so that you can still eat and cook with foods after their peak seasons. Alternatives to refrigerating food have existed throughout history, but the availability and convenience of the fridge has brought some of these practices out of the mainstream.

The two categories of traditional, low-tech food preservation are storing food in containers that control temperature and humidity, or preparing food to slow down its decay. 

Storage Methods for Food Preservation

It is important to note that food storage differs in summer and winter because different variables cause food decay in each season. Traditional food storage containers address the needs of produce through passive strategies that make use of the climate.
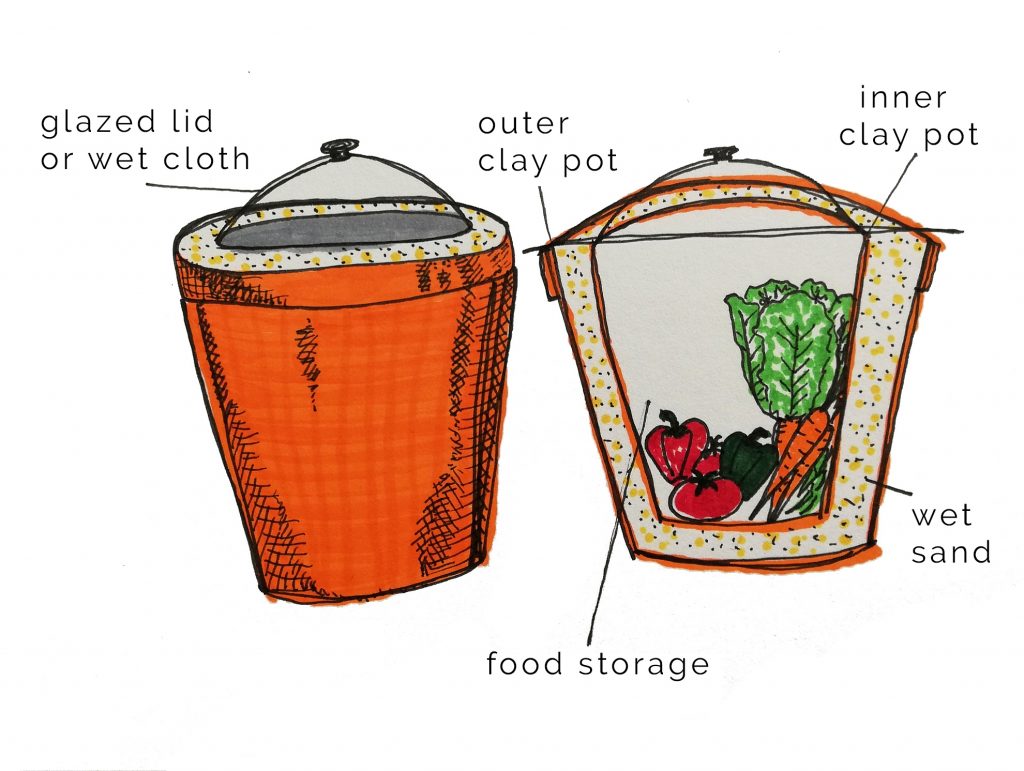

Zeer Pot

In hot and dry climates, natural fridges make use of evaporative cooling on the outer surface of a clay pot. In this method known as the Zeer Pot, water evaporation converts sensible heat to latent heat. This means that energy is released when liquid water is converted to vapor, reducing the temperature inside the container. The method uses two clay pots, one inside of the other. Between the pots is a layer of sand into which water is poured to begin the evaporative cooling process. Evaporation is continuous, ensuring that the natural fridge stays cool all day, but it relies on an outside temperature hot and dry enough to cause evaporation. Because the Zeer Pot serves the function of a fridge, it does not extend the life of food or preserve it any longer than a fridge, but it is necessary to mention when discussing how to store food without refrigerators or freezers. 


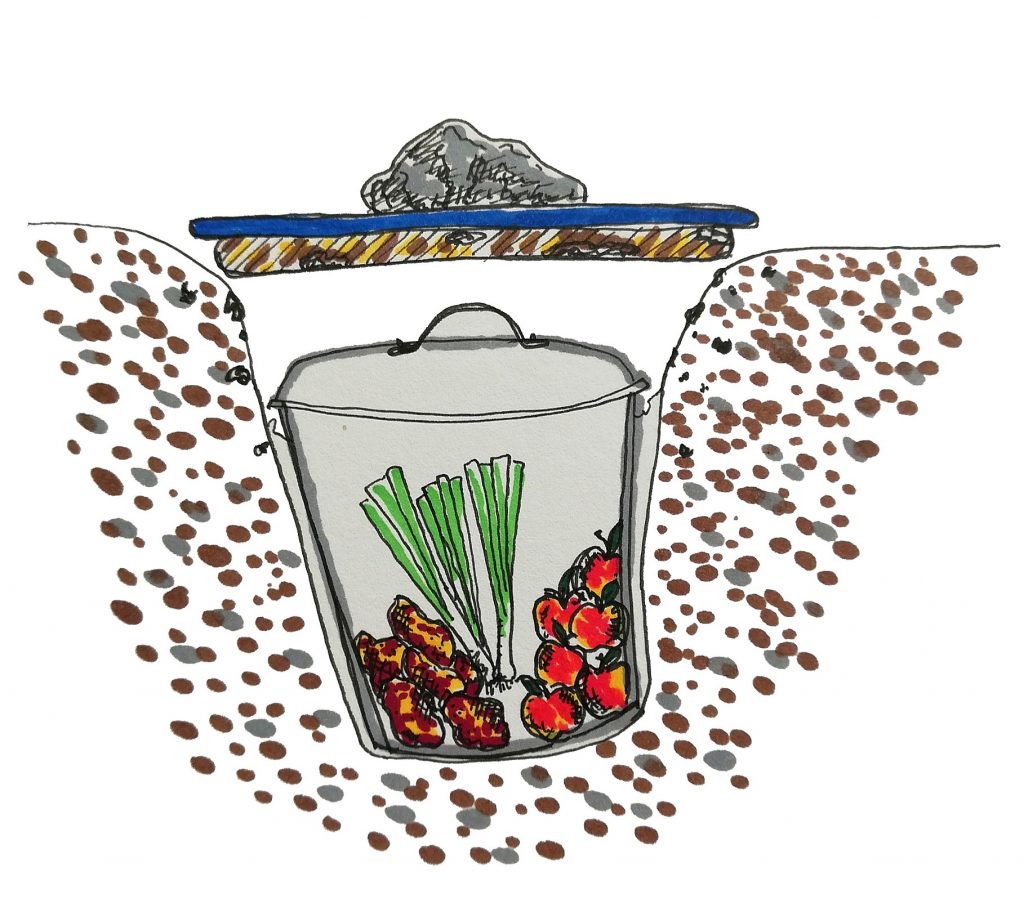
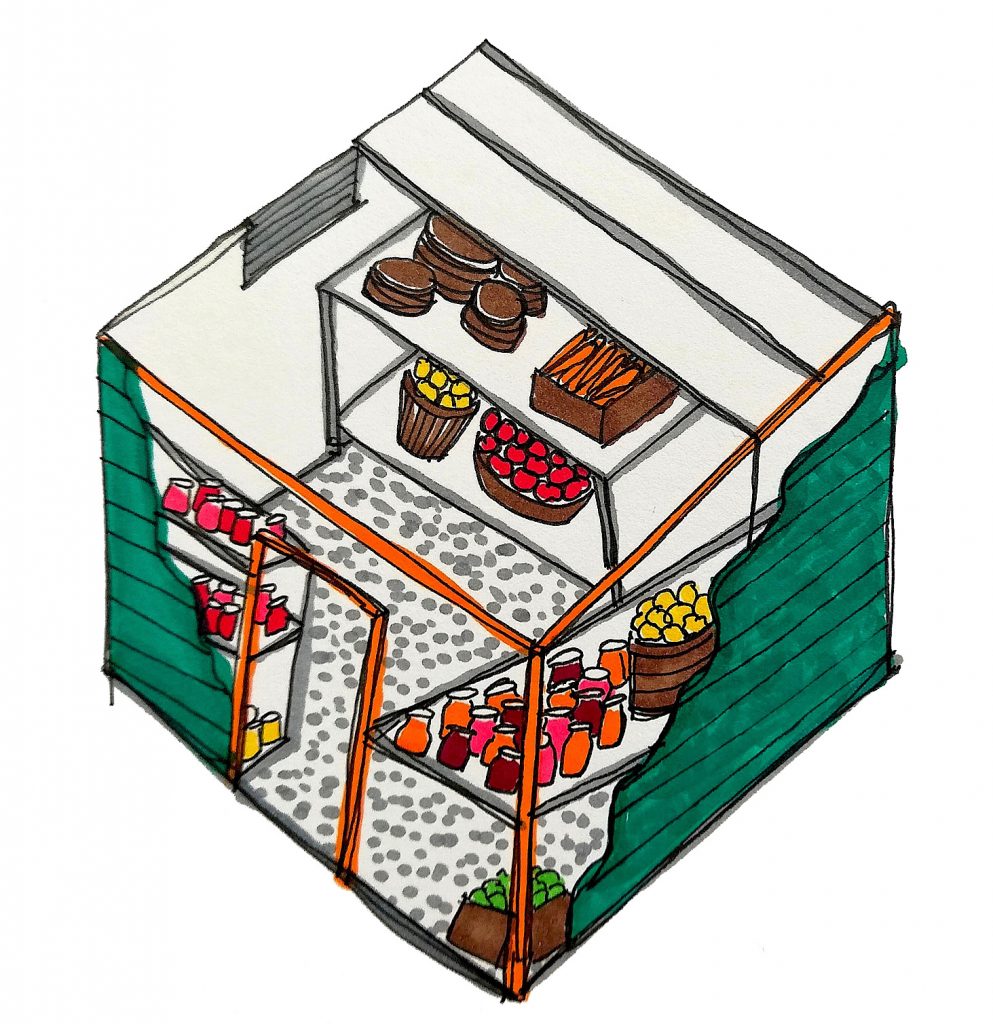
Root clamp using upcycled container

In cool climates and during the Winter months, some vegetables can stay fresh for longer by taking advantage of a steady temperature underground. Root vegetables can avoid frost by being buried, as ground temperatures fluctuate significantly less per day and can stay warmer than the winter air temperature.

Burying vegetables (and some fruits) can be done through covering the planted vegetables with soil or straw, or through harvesting the vegetables and putting them in small underground holes called clamps or silos.[2] Underground food cellars, when available, serve the same purpose. Given that a majority of the world population lives in urban areas, the first option is not as accessible, as it relies on growing your own food in large quantities. The last option, an underground root cellar, is useful for larger quantities of foods and can also be used to extend the shelf life of more than just fruits and vegetables.


Root Cellar

The most accessible of the three ways of burying vegetables is the “clamp” or pits that are completely or partially buried. These can be built relatively quickly using very little garden space and can upcycle used household items (such as washers or steamers). Proper care must be taken to ventilate to avoid mold and to protect the food from rodents or other pests. For protection against rodents, the trench can be lined with rust-resistant metal mesh, which simultaneously aids ventilation. Another method to strengthen ventilation is to place a bundle of twigs in the center of the pit to act as an air shaft. The old drums of washing machines are perforated, which makes them perfect pest protection, but bricks can also be used for the walls and ground of the pit as well. To protect against rain, a plastic sheet can be used to cover the pit, although there may be a problem if the soil around the vegetables becomes extremely saturated from heavy rainfall. 


Root Clamp

Sand storage is helpful to use in tandem with other cold storage methods because it regulates moisture conditions. It can be done at multiple scales, so in large boxes in a root cellar, in a root clamp or food pit, or even at the bottom of your fridge drawer, and it works with all root vegetables, onions, leeks, shallots, and cauliflower.[3] Sand storage entails pouring sand into a container and then submerging the vegetables completely.[4] The sand serves the purpose of a humidity regulator, removing excess moisture, so vegetables cannot be washed before they are stored in this way.[5] Sand storage requires that there be space for ventilation between the vegetables being stored, and the sand container should stay out of heated rooms or areas that are below freezing.[6] If you do not have a food pit, cellar, or food clamp, you can use this method on its own if you have a cold enough garage or, as mentioned above, in the bottom of your fridge drawer.[7]

Preservation Through Food Preparation
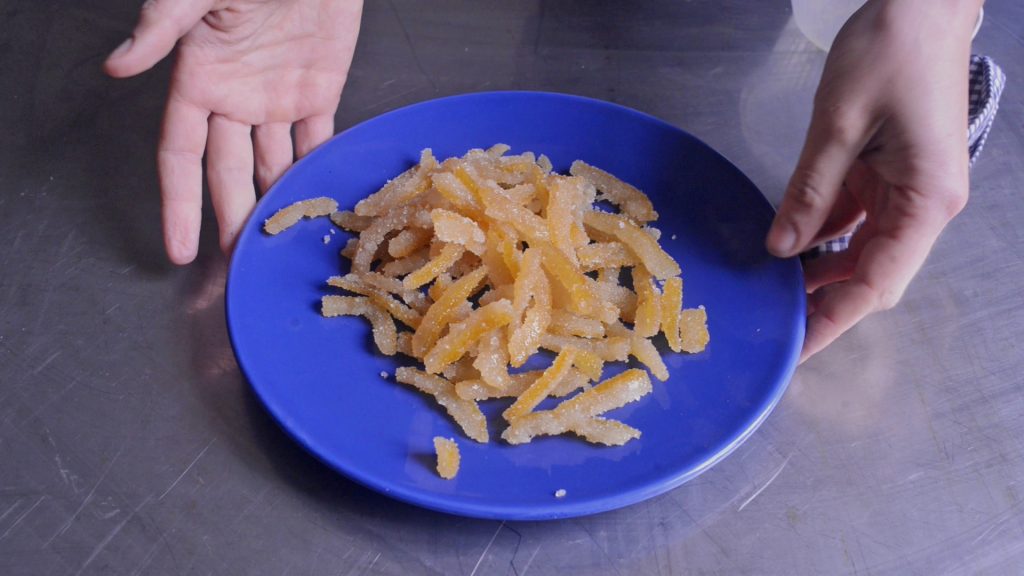
Drying


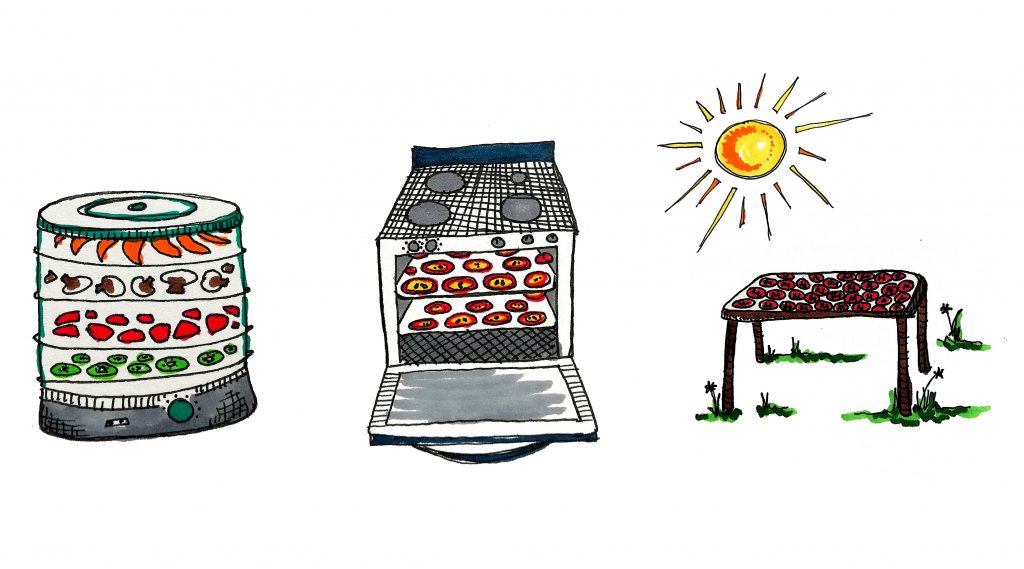
Drying food using a dehydrator, an oven, and the sun

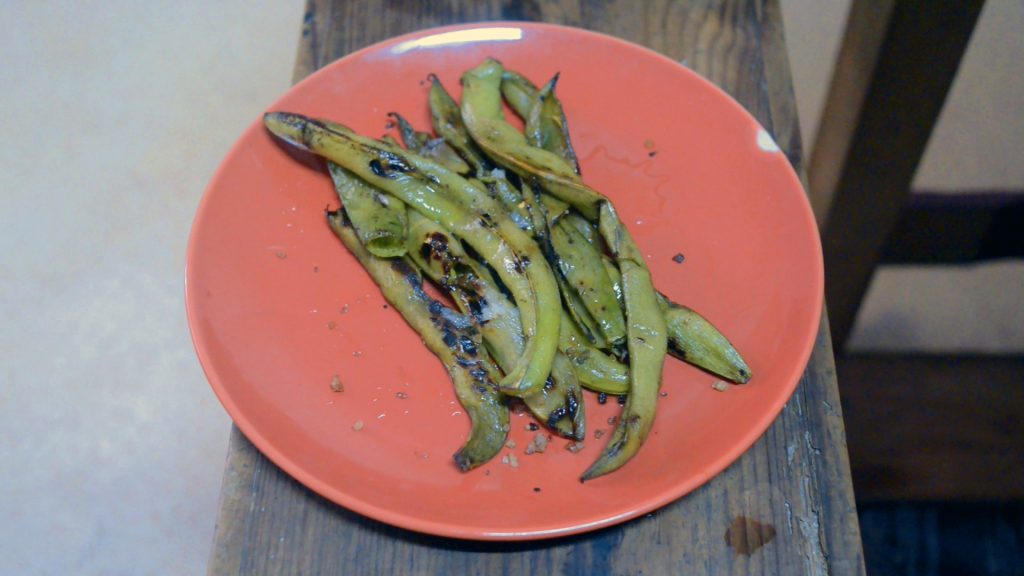
Drying is a method best used for fruit, mushrooms and herbs. It is more easily done during summer because there is more heat and more fruit available to dry, but in the winter, citrus and fungi can be dried in the oven which helps heat the house. Vegetables can also be dried, but they should be blanched, or boiled quickly, before drying, which removes some healthy enzymes.[8] Dried foods retain most of their vitamins, except vitamin C, which degrades quickly.

Foods can be dried in the sun, in an oven, or in a dehydrator, making sure to allow sufficient space for ventilation. The process of drying takes several hours, but it is very hands-off, as most of the work involved is preparing the food by slicing it and putting it on drying trays. When using the oven, care should be taken to set a low enough temperature to avoid burning. Dried fruit is a delicious snack and can be added to baked goods for its flavor and texture. Mushrooms and herbs are multipurpose when dried, and just like dried herbs, mushrooms can be ground to produce a delicious seasoning powder for any meal.

Fermenting

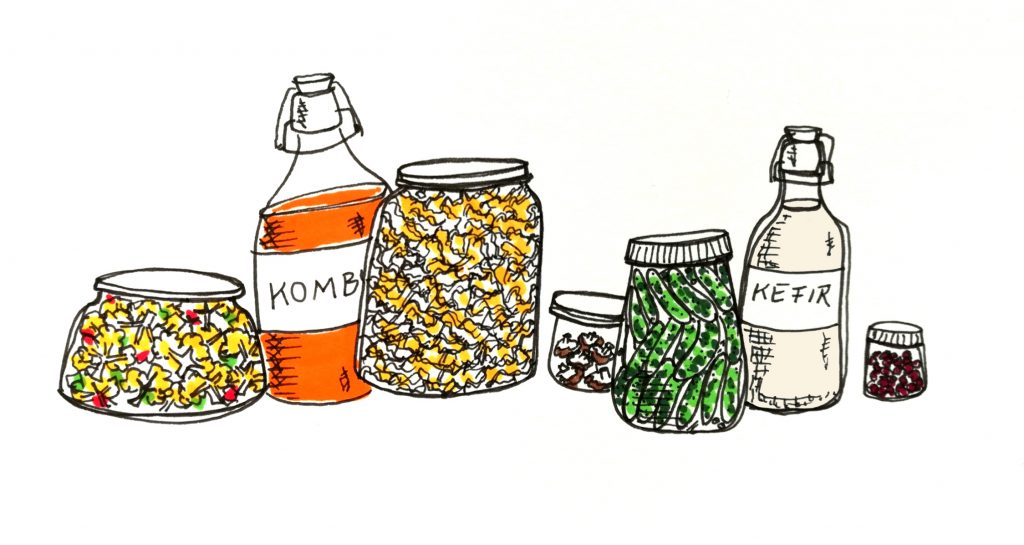
Fermented foods preserve well because the acidic environment blocks bacteria from multiplying. Lactic fermentation is the process in which lactic microbial organisms convert sugars into lactic acid, creating an acidic environment that inhibits bacterial growth.[9] It is best known for making sauerkraut and other cabbage dishes, like kimchi and Salvadorian curtido. Usually the process is to cut vegetables, season them, and leave them in their own juices to ferment for a few days or a few weeks. Then, jars are stored in a cool place—either in a cellar or fridge—and last a year or more. At room temperature, sauerkraut lasts up to a few months,[10] but kimchi will only last about a week if left out.[11] Lactic fermentation allows more raw vegetables to be eaten throughout the year without relying on food travelling long distances. When eaten uncooked, fermented foods preserve their enzyme and vitamin content while adding healthy probiotics.[12] Fermentation adds acidity and a distinct fermented flavor.[13]

Canning and Salting

Canning relies on heat to kill both bacteria and enzymes.[14] Canned food is prepared by placing food in sterilized jars, then boiling the closed jars of food for several minutes to stop factors that cause decay, so the food stays edible almost indefinitely.[15] Canning is an easy process that is helpful for storing foods that will be cooked anyway. However, if we relied on canning to preserve all our food, we would miss out on beneficial enzymes and vitamins.

Salting protects food from the multiplication of bacteria because salt draws the moisture out, creating an inhospitable environment.[16] Often, salted food is rinsed before it is used for cooking, which reduces the sodium but, unfortunately, removes some of the nutritional value from water-soluble vitamins.[17] To work around this disadvantage, salting is best used if the preserved food is intended to be cooked with a high amount of salt, such as in broth, or simply consumed in small quantities.[18]

Our Approach

Every method for storing food in the long-term has specific conditions for which it is ideal. At Critical Concrete, we implemented some of these strategies according to the conditions in Porto.

Local climate is a necessary component of food storage strategies. In the case of Zeer Pots, low humidity is essential to ensure evaporation. As Porto is relatively humid even in the summer, evaporative fridges are not appropriate for keeping food cool in this area. On the other hand, burying produce is optimal in a cool and dry climate.[19] It can even be effective in places that receive snow, as long as certain precautions are taken against moisture.[20] Food preparation for preservation often lasts six months or more. Fermented foods last longer when stored away from sunlight and direct heat, while dried foods need to be stored in a dry environment, such as in dry bags or jars.


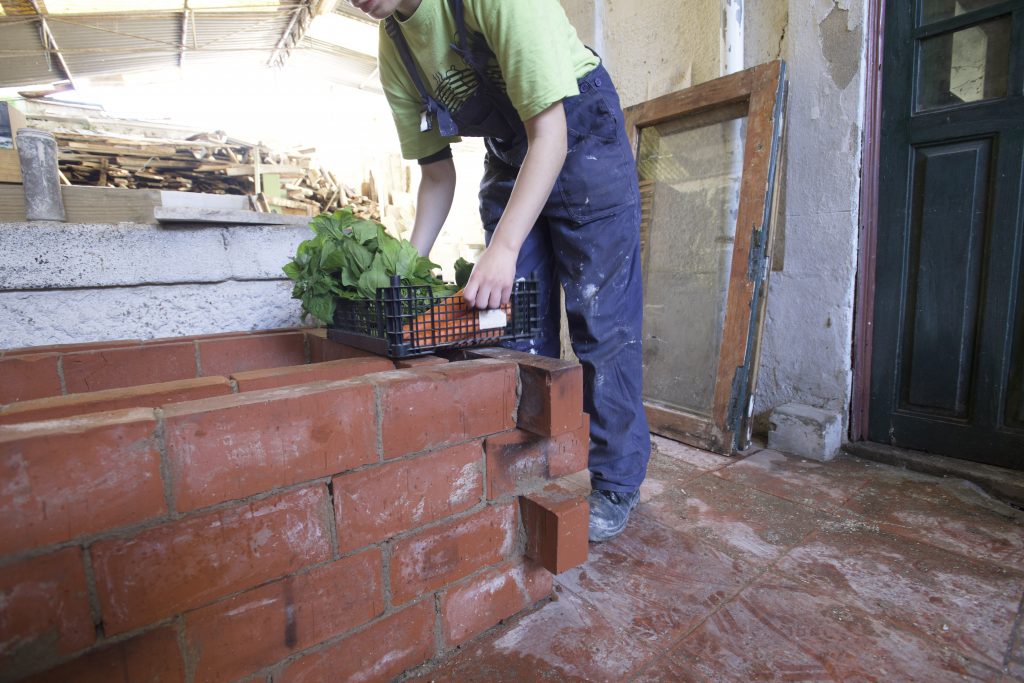
Pouring water in the sand layer of our natural fridge to trigger evaporation

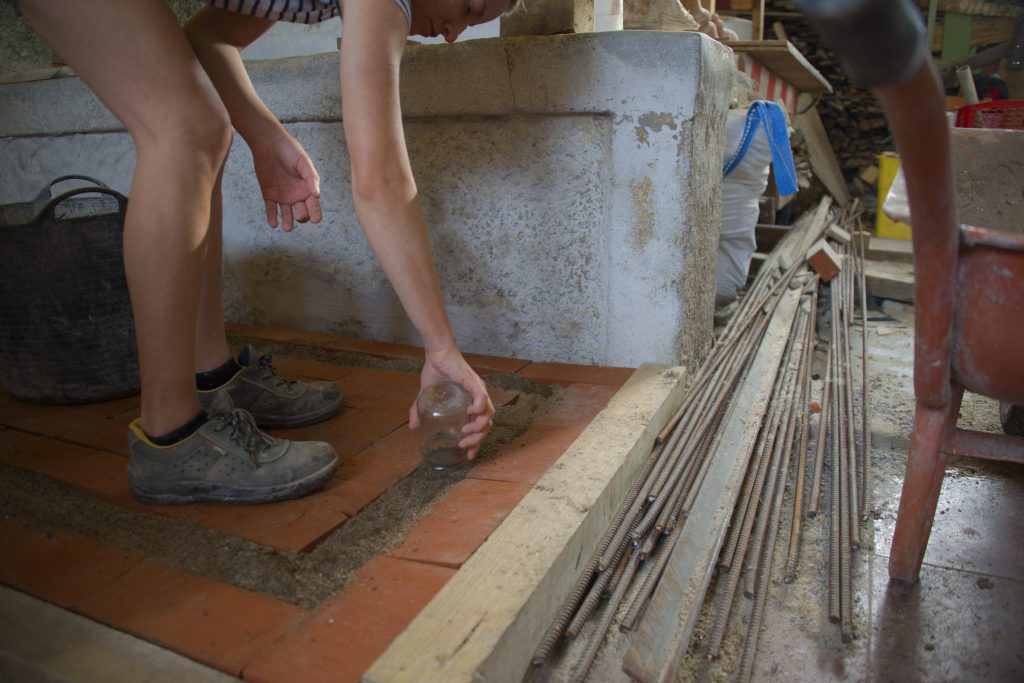
In the Summer of 2019 we attempted to build a natural fridge. However, the temperatures inside were not cold enough to store food; on the hottest day, the fridge was 17 degrees, and on cooler days the temperature inside was 13 at the lowest. This is quite logical given Porto’s humid climate, which resulted in less evaporation, and on the warmest day we recorded temperatures, it was only 21 degrees outside. Our unfortunate results emphasize the need for attention to specific climate in storage methods for food preservation.
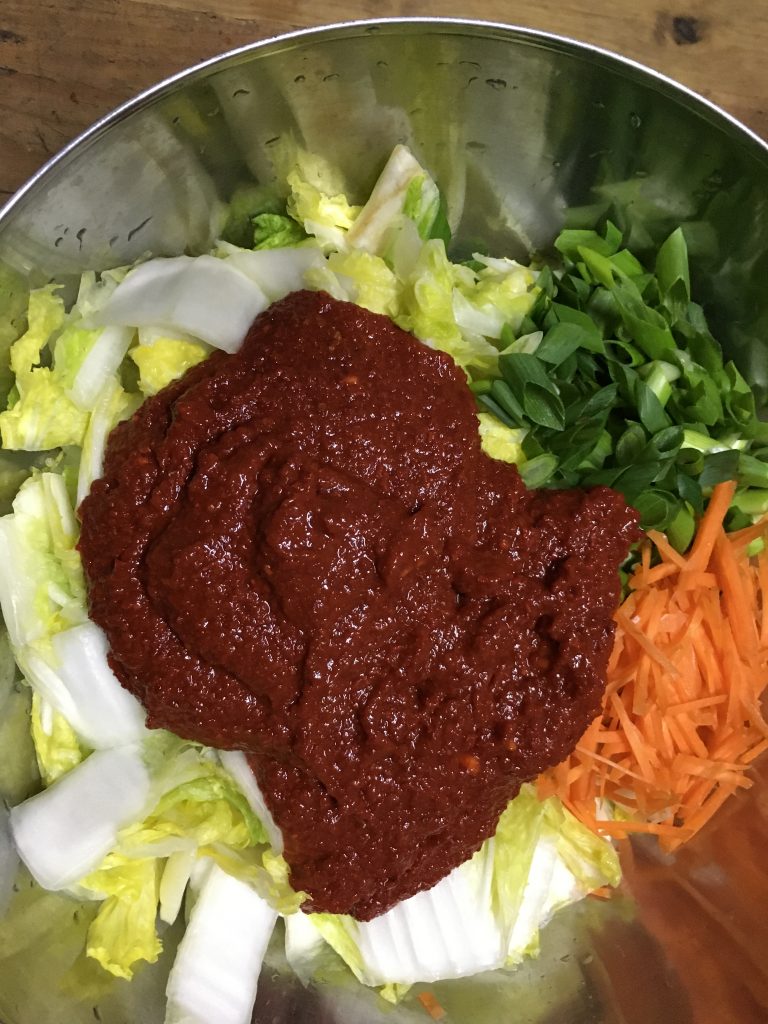
Kimchi

To look into food preparation methods for long-term storage, we attempted lactic fermentation, using a recipe for vegan kimchi available on the blog Maangchi.com.

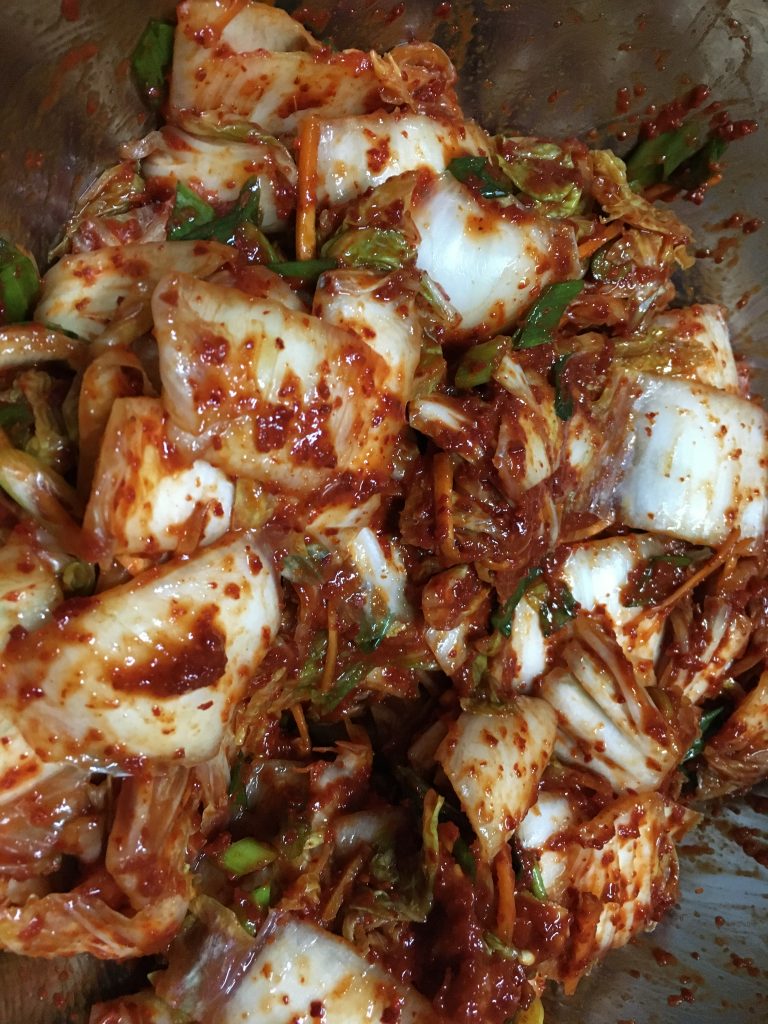
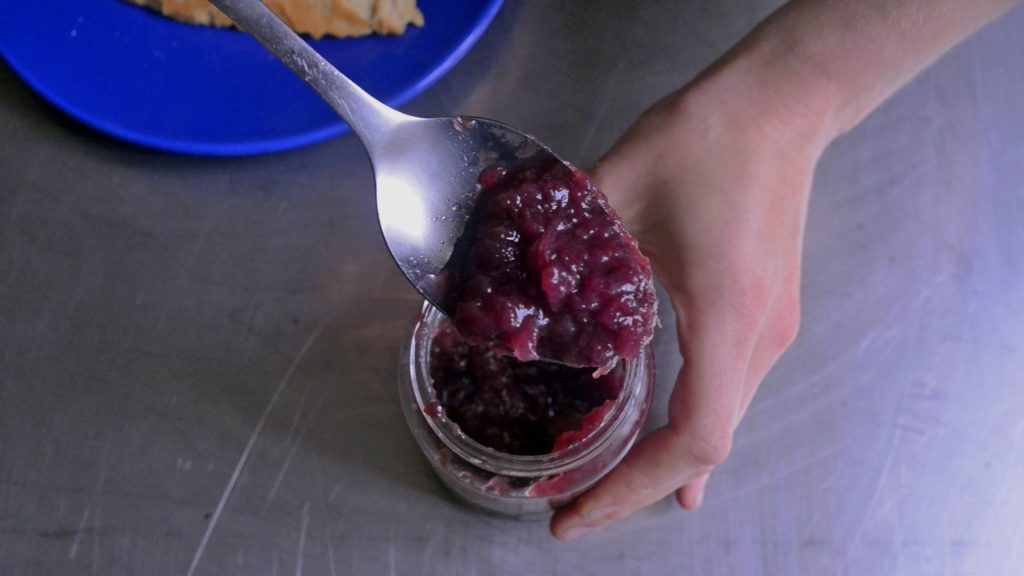
We compressed it into the jars to avoid air bubbles. After 5 days fermenting at room temperature, we placed the delicious kimchi in the fridge. (Normally, fermentation at room temperature only occurs for 1-2 days, but we stored it in a very cold unheated room.)

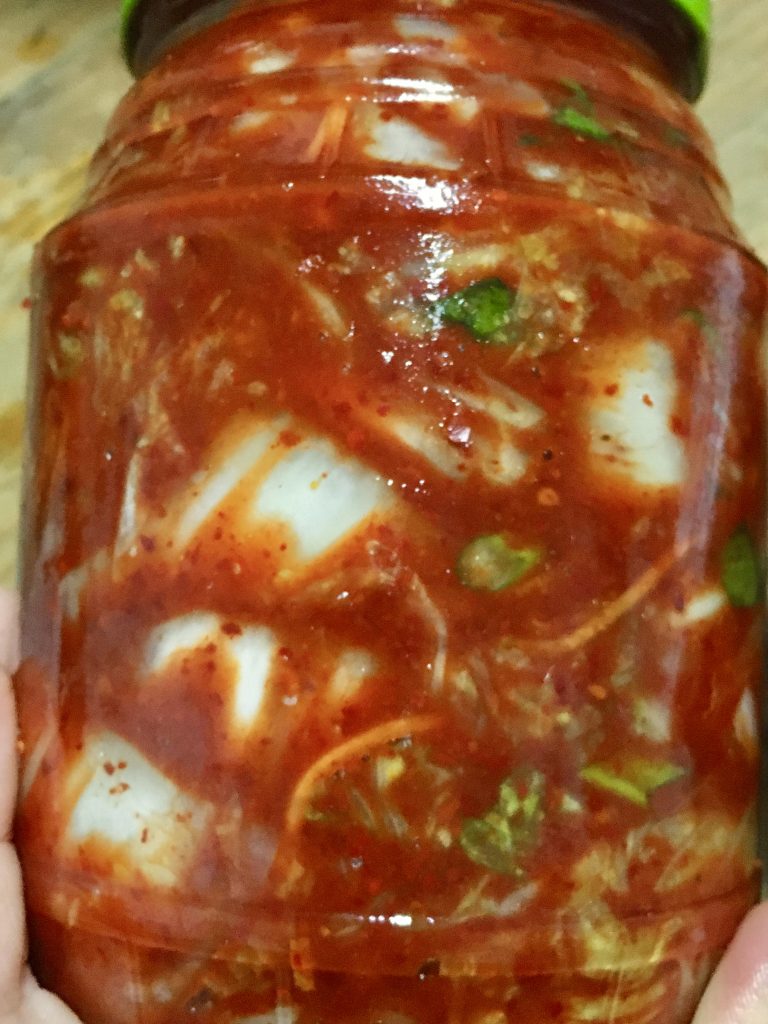
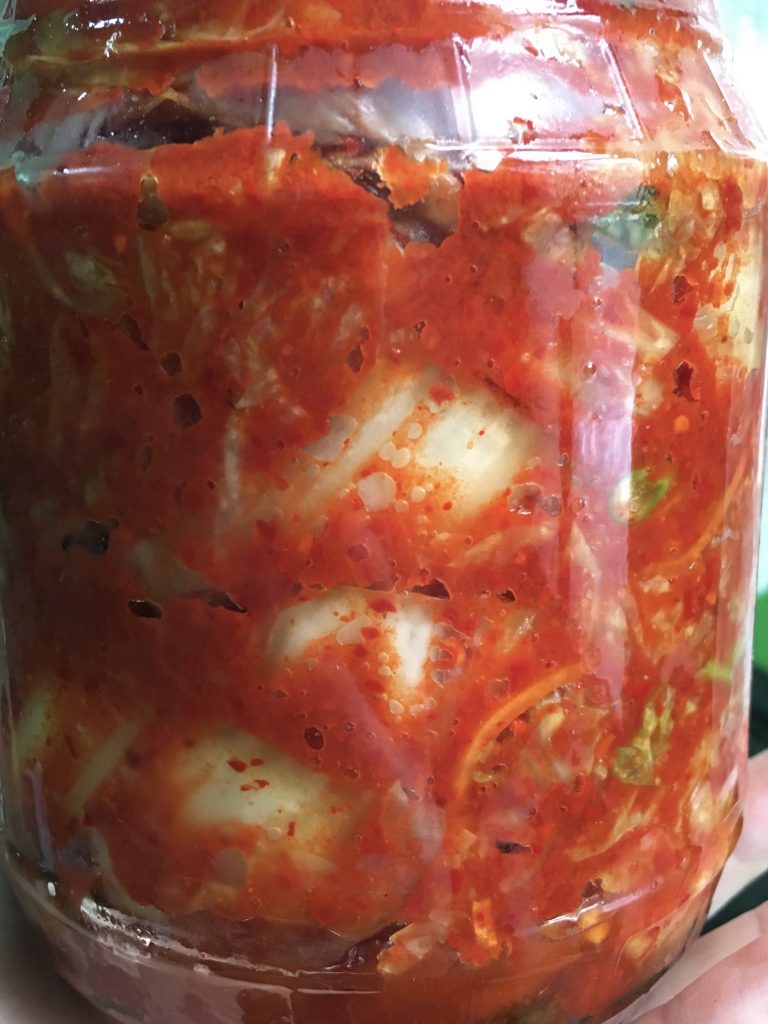
In these before and after images, we can see the evidence of fermentation: there are dozens of air bubbles where, prior to fermentation, we could only see a few. The difference in hue is only due to the artificial lighting used in the first image, however the cabbage is slightly more translucent after fermentation.

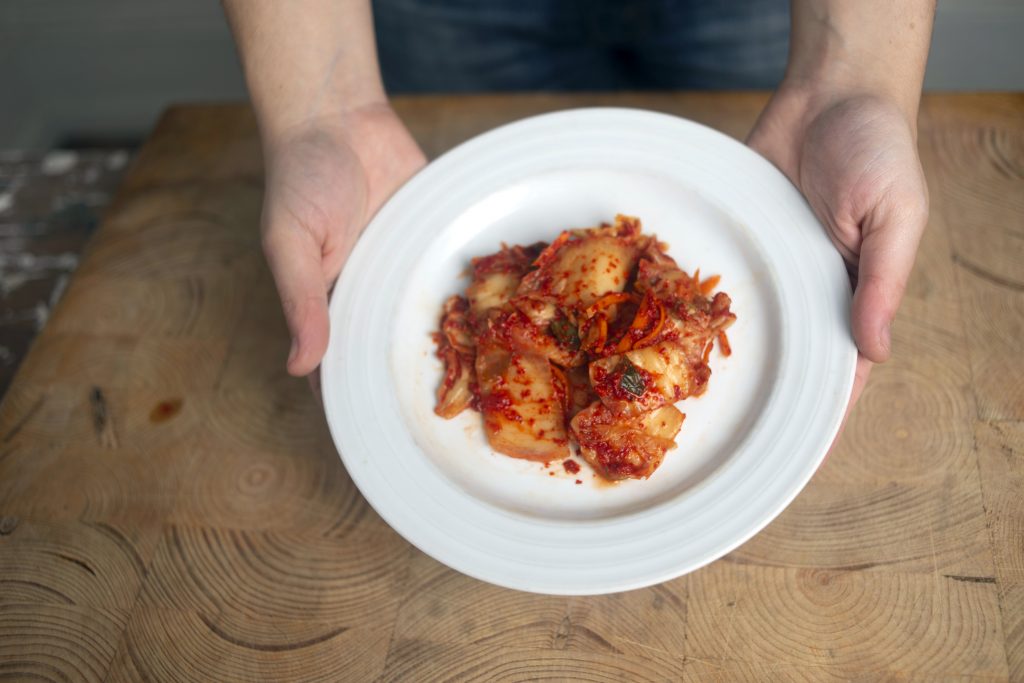
Our kimchi turned out wonderfully, but we noticed a few things in the process of making it. First is that it is not shelf stable, relying on the refrigerator to extend the lifetime past a week. (When we build a cool cellar in the Critical Concrete kitchen, the kimchi can be moved there to limit reliance on the fridge.) Secondly, when getting the cabbage ready to ferment, we noticed that the wider jar made it easier (than two other small jars we filled) to pack kimchi without allowing bubbles. Third of all, though slightly minor, is that when preparing kimchi, it is necessary to soak cabbage in brine and then rinse several times to remove the salt. This has the same caveat as preserving food with salt: losing water-soluble nutrients from rinsing. That being said, kimchi makes up for any lost nutrients in probiotics and flavor, and can last more than a year when stored correctly.

Conclusion

When used in the relatively humid summers of Porto, the Zeer Pot technique offered little relief from the hot outside temperatures. In drier climates, it could be a simple and low tech way to expand cold storage or, even better when possible, reduce the need for a fridge. During the winter, burying food is a great way to extend the life of vegetables, although, as mentioned, the reality of urban living makes it difficult to accomplish in many homes. If it is an option, there are many traditional ways to go about it, but each one needs to carefully protect against moisture, cold, and pests.

How to store food outside of the fridge

Salting and canning are two simple methods of food preservation that are perfect for certain dishes, but both affect the nutrient content of food significantly. Dried food offers a wide variety of purposes: in baked goods, as snacks, or as seasoning. As most homes have an oven, it is quite accessible. During the summer it is more energy efficient, but, on the other hand, can help heat your home in winter. The process of fermenting requires very little energy expenditure and can be used for a wide variety of produce, but it is especially suited for vegetables. In fact, as drying can be better for fruits and fungi, and fermenting is great for vegetables, these two methods of preservation complement each other. Although fermentation alters the flavor of raw foods, this can be a benefit. In the case of our homemade kimchi, fermentation was a success. However, it failed to reduce our reliance on the fridge, while still posing some of the problems of salt-preserved food.

Our food culture is built around having every variety of food available constantly, without inspiring consumers to consider where and how that food is produced. There are often significant challenges to eating local, seasonal food, and, at the same time, it won’t solve the world’s problems to only eat such food. However, eating seasonal food when possible leads to more delicious, nutritious meals and helps the environment simultaneously. 

Stay tuned for our next food article in the series, on the use of food scraps.

Sources

[1] Ritchie, Hannah. “You Want to Reduce the Carbon Footprint of Your Food? Focus on What You Eat, Not Whether Your Food Is Local.” Our World in Data, Global Change Data Lab, 24 Jan. 2020, ourworldindata.org/food-choice-vs-eating-local. 

[2] Preserving Food without Freezing or Canning: Traditional Techniques Using Salt, Oil, Sugar, Alcohol, Vinegar, Drying, Cold Storage, and Lactic Fermentation. Chelsea Green Pub., 2007. 

[3] https://www.gardeningknowhow.com/edible/vegetables/vgen/storing-root-crops-in-sand.htm#:~:text=Root%20veggies%20that%20grow%20vertically,to%20entombing%20them%20in%20sand. accessed 18 February, 2021.

[4] https://www.gardeningknowhow.com/edible/vegetables/vgen/storing-root-crops-in-sand.htm#:~:text=Root%20veggies%20that%20grow%20vertically,to%20entombing%20them%20in%20sand. accessed 18 February, 2021.

[5] https://www.gardeningknowhow.com/edible/vegetables/vgen/storing-root-crops-in-sand.htm#:~:text=Root%20veggies%20that%20grow%20vertically,to%20entombing%20them%20in%20sand. accessed 18 February, 2021.

[6] https://www.gardeningknowhow.com/edible/vegetables/vgen/storing-root-crops-in-sand.htm#:~:text=Root%20veggies%20that%20grow%20vertically,to%20entombing%20them%20in%20sand. accessed 18 February, 2021.

[7] https://www.gardeningknowhow.com/edible/vegetables/vgen/storing-root-crops-in-sand.htm#:~:text=Root%20veggies%20that%20grow%20vertically,to%20entombing%20them%20in%20sand. accessed 18 February, 2021.

[8] Preserving Food without Freezing or Canning: Traditional Techniques Using Salt, Oil, Sugar, Alcohol, Vinegar, Drying, Cold Storage, and Lactic Fermentation. Chelsea Green Pub., 2007. 

[9] Preserving Food without Freezing or Canning: Traditional Techniques Using Salt, Oil, Sugar, Alcohol, Vinegar, Drying, Cold Storage, and Lactic Fermentation. Chelsea Green Pub., 2007. 

[10] https://growyourpantry.com/blogs/fermenting-pickling-preserving/how-long-does-sauerkraut-last, accessed 18/01/21.

[11] https://www.healthline.com/nutrition/does-kimchi-go-bad#shelf-life, accessed 18/01/21.

[12]Preserving Food without Freezing or Canning: Traditional Techniques Using Salt, Oil, Sugar, Alcohol, Vinegar, Drying, Cold Storage, and Lactic Fermentation. Chelsea Green Pub., 2007. 

[13] Preserving Food without Freezing or Canning: Traditional Techniques Using Salt, Oil, Sugar, Alcohol, Vinegar, Drying, Cold Storage, and Lactic Fermentation. Chelsea Green Pub., 2007. 

[14] Seymour, John. The Self-Sufficient Gardener: A Complete Guide to Growing and Preserving All Your Own Food. Dolphin, 1980. 

[15] Seymour, John. The Self-Sufficient Gardener: A Complete Guide to Growing and Preserving All Your Own Food. Dolphin, 1980. 

[16] Preserving Food without Freezing or Canning: Traditional Techniques Using Salt, Oil, Sugar, Alcohol, Vinegar, Drying, Cold Storage, and Lactic Fermentation. Chelsea Green Pub., 2007. 

[17] Preserving Food without Freezing or Canning: Traditional Techniques Using Salt, Oil, Sugar, Alcohol, Vinegar, Drying, Cold Storage, and Lactic Fermentation. Chelsea Green Pub., 2007. 

[18] Preserving Food without Freezing or Canning: Traditional Techniques Using Salt, Oil, Sugar, Alcohol, Vinegar, Drying, Cold Storage, and Lactic Fermentation. Chelsea Green Pub., 2007. 

[19] Preserving Food without Freezing or Canning: Traditional Techniques Using Salt, Oil, Sugar, Alcohol, Vinegar, Drying, Cold Storage, and Lactic Fermentation. Chelsea Green Pub., 2007. 

[20] Preserving Food without Freezing or Canning: Traditional Techniques Using Salt, Oil, Sugar, Alcohol, Vinegar, Drying, Cold Storage, and Lactic Fermentation. Chelsea Green Pub., 2007. 

The post Knowing our Food: Preservation first appeared on Critical Concrete.

Knowing Our Food: Storage

Though food nourishes us every day, there is still much that we can learn about it. At Critical Concrete, we aim to consume as much local, seasonal food as possible and we have recently started growing it ourselves in our food forest. Unfortunately, it is quite common that we as a society eat food without paying attention to its seasonal availability; it is easy to be influenced by a globalized system that makes practically any food available at any time in the year regardless of climate and the environmental impact. The production of food outside of its peak season can have 3-10 times the emissions as food imported from better climates, so it is important to not only support local farmers, but also to mind the seasonality of fruits and vegetables.[1] While some imported foods, such as almonds and avocados, are imported by boat and have a lower footprint than locally produced options, other more perishable foods are freighted by air, which creates 50 times the carbon emissions as boat transportation.[2] Aside from environmental friendliness, seasonal, local food can be more nutritious and flavorful as it has more time to ripen before harvest, and supports small farms and sustainable farming practices.

That being said, choosing local and seasonal produce means nothing if our food goes bad before we have the chance to eat it. That means that storing food to extend its lifespan is highly important. This research grew out of our curiosity to know more about alternative ways of storing food that are not energy consuming. However, as we encountered more information, the research evolved to focus more on food knowledge, with the aim of informing ourselves and our readers about the needs of our fruits and vegetables and how we can store and consume them. Our upcoming articles from this research will delve into the topics long-term storage, food production, and the use of food scraps, and in this article, we will discuss how to make use of conventional kitchen storage to keep food fresh. 

Food Waste and the Fridge

Food waste is an immense problem that worsens each year. In fact, fighting food waste has been determined to be one of the most urgent solutions to fighting climate change.[3] The production and disposal of wasted food results in water waste, land waste and deforestation, and greenhouse gas emissions. Although a tremendous amount of food waste is the result of industrial food practices, in Europe 42% of food is thrown out by the consumer, and only one third of that food wasted consists of inedible residuals (skin, shells, peels).[4] Regardless of whether climate change can be tackled through individual actions, consumers can still reduce the amount of food lost to spoilage in their own homes. Even if it does not solve environmental issues in and of itself, when we learn about proper food storage and reduce our waste, we save money and take the first steps toward better societal food practices.

At first we were inclined to look for alternatives to our usual house appliances like the fridges, as refrigerants like chlorofluorocarbons (CFCs) are the main cause of the depletion of the ozone layer.[5] This led us to a few methods of long-term storage, which we built as prototypes to evaluate their efficacy in the climate our research lab is located in. Keep an eye out for our next article, detailing these methods and their benefits for different foods and environments.

However, it can’t be ignored that storing food in the fridge and freezer is such common practice, so this article will describe the ways to reduce food waste in the context of conventional storage practices. Thus we first have to analyse the way the fridge is used, to know its strong and weak points and the way it works. Additionally, it is crucial to understand the process of food decay and the science behind it. Once it is understood how food decays, the same principles can be applied everywhere. In order to reach a balance in the system, minimizing waste and prolonging the life of food, we must first know the needs of fruits and vegetables and demystify their storage environments, both artificial and natural.


Where to store different fruits and vegetables

Food Decay

Knowledge about everyday storage of fruits and vegetables is essential. In order to better understand the proper storage of fresh vegetables and fruits, the first step is to clarify the biochemical characteristics and processes which occur after harvesting. This knowledge can help reveal why certain foods become rotten very fast whereas other foods last for a long time. This phenomenon is influenced by two factors: the speed of natural metabolism depending on the specific plant and the way it is stored. 

Enzymes are proteins which serve as catalysts to chemical changes in living organisms and there are thousands of different enzymes with varying functions. Enzymes in our food cause changes to fruit and vegetables which cause them to spoil. In cool temperatures, these enzymes slow their activity, and they can die when cooked above 60 degrees.[6] 

Aside from enzymes, three other rotting agents can reduce the life of food. These are mold, which is visible, yeasts, which convert sugars into alcohol through fermentation, and bacteria, some of which can poison food.[7] Using this information, we can determine how to avoid mold and bacteria, and slow down the process of decay.

Conditions for storage

The best storage method for a given food depends primarily on three parameters: temperature, humidity and ripening.

Temperature: Cooling down slows down the metabolic process and thus has an immense effect on preservation. Nevertheless, there are certain plants, such as bananas, tomatoes, eggplants or cucumber which are very sensitive to the cold and also others which lose vitamins and taste.[8] Moreover you should take into consideration where in the refrigerator to put things. The middle and the back are usually colder than the other areas of the fridge.[9] As there is no cooling on the bottom cold air coming from the middle can warm up and rise up which leads to the different temperatures levels.[10] 


Zones of the fridge and their temperatures

Humidity: Many fruits and vegetables, such as cucumbers, leafy greens, carrots and roots, are susceptible to humidity loss and shriveling.[11] For these, it is important to ensure a high level of atmospheric humidity. Many refrigerators have a crisper drawer for vegetables in order to keep a higher level of humidity. Some vegetables that should definitely be stored in the crisper drawer are spring onions, celery root, spinach, and leeks.[12] Otherwise, vegetables that are susceptible to moisture loss can be wrapped in damp towels and stored in other areas of the fridge.

Ripening: In basic terms, ripening can divide produce into two groups: the kind that continues the process of ripening after the harvest and the kind which abruptly stop ripening when harvested. This fact depends on the natural plant hormone ethylene. Ethylene is a gaseous hydrocarbon (C₂H₄) which speeds up the ripening process.[13] Some fruits and vegetables release ethylene gas in the process of becoming ripe.[14] Others, by contrast, are sensitive to ethylene and absorb it.[15] If you do not want to speed up the ripening and  spoiling effect, try to store ethylene-sensitive vegetables apart from those which release a lot of ethylene. 


Ethylene production and sensitivity in fruits and vegetables

According to their ethylene production, apples, tomatoes, peaches, apricots, avocados, kiwi, mango and bananas should be stored apart from other fruits and vegetables.[16] But you can also make use of this property when you want something to ripen faster. In that case, you purposefully store high ethylene producers together with ethylene sensitive ones.[17] When you have green tomatoes you can store them together with apples in order to get them to ripen faster.      

Referring to proper storage, there are some rules of thumb about food that should never be stored in the refrigerator. Fruits sensitive to cold are pineapples, avocados, bananas, mandarins, mango and melons.[18] Vegetables sensitive to cold are artichokes, tomatoes, potatoes, eggplants, garlic and onions.[19] Nevertheless, there are some real divas who cannot really decide whether they want to be stored in the fridge or in the room. Cucumbers and zucchinis for example are sensitive to cold but if too warm they lose humidity and start to shrivel fast.[19] Therefore, they should be stored in the crisper drawer or in the top part of the refrigerator, wrapped in a damp towel to avoid cold damage and humidity loss.[20]        

Additional Specific Storage Strategies 

With this knowledge of general food storage, we can delve into more specific ways to increase the lifespan of our fruits and vegetables. Berries and cherries are susceptible to mold, so they should not be washed until just before they are eaten.[21] Also, berries are often quite fragile and should be stored in a single layer, if possible.[22] Figs are sensitive to humidity, which makes paper bags good storage containers to absorb their excess moisture, but they can also be stored on plates in the fridge.[23]

As for vegetables, removing rubber bands from the stems is always the first step.[24] Radishes, beets, carrots, and turnips, should be separated from their greens to avoid losing moisture in the roots.[25] Then, the roots can be stored in an open container with a wet towel placed on top.[26] Greens are best in closed containers alongside a damp cloth to keep them from drying.[27] However, you can save room in the fridge by storing kale, chard, and collard greens upright in glasses of water on the counter.[28] Celery and fennel can be stored this way as well.[29] Asparagus is best stored upright in a water inside the fridge.[30] It should be noted that using paper bags, reusable containers, glasses, or damp cloths should make it easy to eliminate the need for any single-use plastic inside the fridge.

Conclusion      

Hopefully, being more cognisant of the needs of fruits and vegetables can limit food ending up in the trash or compost. Now that we understand how the chemical processes happening inside fruits and vegetables cause them to react to different conditions, we can store it in the right way. We can take advantage of the different areas inside your fridge, and organize our fridges to maximize the lifespan of our food. To help adjust to all this new information, we produced a chart to help understand fruits and vegetables and store them in the best way possible. Download it, print it, and put it on the wall in your kitchen! 

In our next article about food we will discuss different ways to store food for longer periods of time and the benefits of each method. Stay tuned to learn how fruits and vegetables can be enjoyed past the periods when they are in season, without forfeiting the nutritional value and flavor of eating seasonal food.

VIEW AND SAVE OUR GUIDE

Bibliography:

[1] https://ourworldindata.org/food-choice-vs-eating-local, opened 8.12.2020.

[2] Ibid.

[3] Hawken, Paul. Drawdown: The Most Comprehensive Plan Ever Proposed to Reverse Global Warming. New York, New York: Penguin Books, 2017.

[4] Principato, Ludovica. Food Waste at Consumer Level a Comprehensive Literature Review. Springer International Publishing, 2018. p. 5.

[5] https://www.conserve-energy-future.com/causes-and-effects-of-ozone-hole.php, opened 8th of December, 2020.

[6] Seymour, John. The Self-Sufficient Gardener: A Complete Guide to Growing and Preserving All Your Own Food. Dolphin Books, 1980. 

[7] Ibid.

[8] https://www.rollende-gemuesekiste.de/wp-content/uploads/Lagertipps.pdf, opened 24.11.2020.

[9] Ibid.

[10] Ibid.

[11] 

[12]https://myplasticfreelife.com/wp-content/uploads/images/Berkeley%20Farmers%20Market%20Tips%20for%20Storing%20Produce.pdf, opened 27.11.2020.

[13] https://www.theproducenerd.com/2018/02/what-is-ethylene-how-is-it-used/, opened 10.12.2020 December

[14] Ibid.

[15] Ibid.

[16] Sächsische Landesanstalt für Landwirtschaft. Verbraucherinformationen Obst Und Gemüse Richtig Lagern, 2003.

[17] https://www.rollende-gemuesekiste.de/wp-content/uploads/Lagertipps.pdf 

[18]https://myplasticfreelife.com/wp-content/uploads/images/Berkeley%20Farmers%20Market%20Tips%20for%20Storing%20Produce.pdf, opened 27.11.2020.

[19] Ibid.

[20] Ibid.

[21] Ibid.

[22] Ibid.

[23] Ibid.

[24] Ibid.

[25] Ibid.

[26] Ibid.

[27] Ibid.

[29] Ibid.

[30] Ibid.

The post Knowing Our Food: Storage first appeared on Critical Concrete.
Did you miss our previous article…
https://concretedoctorsolutions.net/?p=169